Is Ready Mix Plaster Waterproof? What Contractors Should Know Before Application
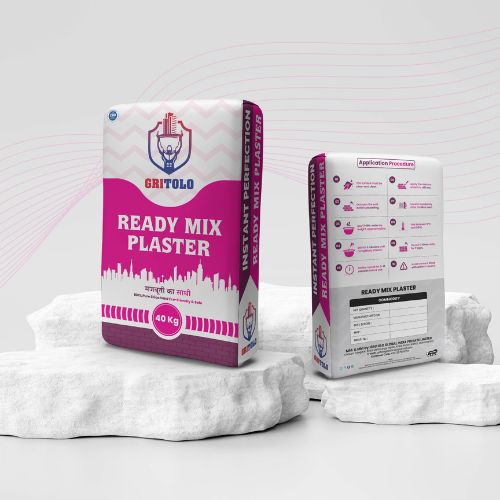
Not all plaster is waterproof by default — standard cement plaster is porous and absorbs water, which is exactly why exterior walls in India crack, peel, and grow damp patches within a few monsoon seasons. Waterproof plaster becomes genuinely water-resistant only when it includes an integral waterproofing compound or polymer additive mixed into the plaster itself, rather than relying on a separate paint-on coating applied after the fact. Ready mix plaster formulated with these additives — like Gritolo’s Ready Mix Plaster — is designed to resist water penetration at the material level, not just at the surface, which is the difference between a wall that survives ten monsoons and one that needs re-plastering every two or three years.
This guide breaks down exactly how waterproof plaster works, what causes waterproofing failure on Indian exterior walls, how to apply it correctly, and what it should realistically cost — so you can make an informed decision whether you’re a contractor specifying materials or a homeowner reviewing a quote.
Why Exterior Walls in India Need Waterproof Plaster
Indian exterior walls face a harsher water-exposure cycle than walls almost anywhere else — intense monsoon rainfall for 3-4 months, followed by long dry, high-UV periods that repeatedly expand and contract the wall surface. This cycle is what actually destroys ordinary plaster, not the water alone.
Here’s the mechanism in plain terms: ordinary cement plaster has microscopic capillary pores. During monsoon, rainwater is drawn into these pores by capillary action — the same effect that pulls water up a paper towel. Once inside the wall, that moisture has nowhere to go quickly. In coastal and high-rainfall regions (Mumbai, Pune, Kerala, the Konkan belt, the North-East), walls can stay damp for weeks at a stretch during peak monsoon.
The damage shows up in stages:
- Efflorescence — white, powdery salt deposits that form as trapped water evaporates and leaves mineral salts on the surface
- Dampness and staining — visible on interior walls, especially at ceiling-wall junctions and around window frames
- Paint peeling and blistering — moisture pushing outward from beneath the paint film
- Micro-cracking — repeated wet-dry cycles fatigue the plaster, and cracks widen every year until water ingress accelerates further
- Rebar corrosion — in RCC-frame buildings, water reaching embedded steel reinforcement causes rusting and spalling, which is a structural issue, not just cosmetic
This is why waterproofing exterior plaster isn’t a cosmetic upgrade in the Indian context — it’s a structural durability decision that affects maintenance costs for the next 15-20 years.
What Causes Waterproofing Failure in Exterior Plaster
Most waterproofing failures aren’t due to bad materials — they’re due to preventable application errors. Understanding these up front saves both cost and callback visits.
1. Skipping surface preparation. Plaster applied over dust, oil residue, loose particles, or a previous flaking coat will never bond properly, regardless of how good the plaster mix is. Adhesion failure is the single most common root cause of early waterproofing breakdown.
2. Wrong plaster thickness. Waterproof plaster generally needs to be applied at a minimum thickness (commonly 12-15mm for a single coat, sometimes done in two coats for exterior-grade jobs) to form a continuous, pore-free barrier. Thin, rushed applications leave weak points where water finds a path through.
3. Inadequate curing. This is the most underrated cause of failure. Cement-based plaster — waterproof or not — needs consistent moisture during the first 7-10 days to properly hydrate and develop strength. Skipping curing, or curing for only 2-3 days because a project is behind schedule, produces a plaster that’s technically “dry” but structurally weak and more porous than it should be.
4. No movement/expansion joints on large wall spans. Long, unbroken exterior wall runs need control joints to accommodate thermal expansion. Without them, cracks form at predictable stress points and become the first entry route for water.
5. Ignoring junction details. Water rarely fails through the middle of a flat wall — it fails at junctions: window sills, parapet copings, pipe penetrations, and the plinth level near the ground. These need additional detailing (drip mouldings, sealant beading) that a standard flat-wall application misses.
Types of Waterproofing Solutions for Exterior Plaster in India
There are four common approaches contractors use, and they’re not interchangeable — each suits a different budget and risk profile.
Ready mix waterproof plaster — a factory-proportioned plaster with polymer-modified, water-repellent additives already blended in. You add water on-site and apply. This gives consistent quality batch-to-batch, since the waterproofing compound is dosed precisely at the factory rather than estimated by hand on-site.
Site-mixed cement plaster + separate waterproofing compound — traditional approach where a liquid or powder waterproofing admixture (like an integral waterproofing compound) is manually added to a standard cement-sand mix at the site. This works, but consistency depends entirely on how carefully the mason doses and mixes it — a common source of the failures above.
Polymer-modified render/plaster systems — higher-end, often imported or premium-tier systems with acrylic or elastomeric polymers, used mostly on high-rise or architecturally exposed facades. More flexible (better crack-bridging) but priced significantly higher.
Waterproof cement paint or elastomeric coating over standard plaster — this is a surface-level fix, not a plaster-level one. It’s cheaper upfront and easier to apply, but it only protects as long as the paint film stays intact — typically 3-5 years before recoating is needed. It doesn’t address the underlying plaster’s porosity, so if the coating fails, the wall is exposed again.
For most residential and mid-rise commercial exterior applications in India, ready mix waterproof plaster offers the best balance of consistency, durability, and cost — you get factory-controlled waterproofing performance without depending on manual on-site dosing accuracy.
How Ready Mix Plaster Achieves Waterproofing
Ready mix plaster like Gritolo’s formulation achieves water resistance through a few combined mechanisms rather than a single additive:
- Pore-blocking/hydrophobic additives reduce the plaster’s capillary absorption, so water beads and runs off rather than being drawn into the wall.
- Polymer modification improves flexibility and bond strength, which reduces the hairline cracking that becomes water’s entry point over time.
- Consistent particle grading (properly graded sand and binder) reduces the void content in the cured plaster — fewer voids means fewer paths for water to travel through.
- Factory-controlled proportioning removes the variability of manual site-mixing, so every bag delivers the same water-resistance performance instead of varying mason-to-mason.
In practical terms, this means a correctly applied and cured ready mix waterproof plaster should significantly reduce water absorption compared to plain cement plaster, and hold up through multiple monsoon cycles with proper detailing at junctions — though exact absorption and performance figures vary by exact product grade, so always check the current technical data sheet for specific numbers before quoting a client.
Step-by-Step Application Process
Step 1 — Surface preparation. Remove all loose material, dust, and old flaking paint or plaster. For masonry surfaces (brick or AAC block), rake out joints slightly to improve mechanical key. Dampen the wall surface evenly — a saturated-surface-dry (SSD) condition — before applying the base/scratch coat, to prevent the substrate from pulling moisture out of the fresh plaster too fast.
Step 2 — Apply a bonding/scratch coat if required. On smooth concrete surfaces especially, a thin bonding slurry or scratch coat improves adhesion for the main plaster coat.
Step 3 — Mix the ready mix plaster. Follow the manufacturer’s water-to-powder ratio exactly — this is usually printed on the bag. Over-watering is one of the most common on-site mistakes; it dilutes the waterproofing additives and weakens the cured strength.
Step 4 — Apply in the specified thickness. Typically applied at 12-15mm for a single-coat exterior application, sometimes in two passes (a base coat plus a finishing coat) for better crack control on larger wall areas. Work in manageable sections to maintain a wet edge and avoid visible joint lines.
Step 5 — Finish and texture. Depending on the desired look, finish with a wooden float (for a rougher, more water-shedding texture) or steel trowel (for a smoother finish). Rougher textures can actually help shed water faster on exposed facades.
Step 6 — Cure properly. This step determines whether the waterproofing actually performs long-term. Keep the plaster moist for a minimum of 7 days — light water spraying twice daily, or covering with damp hessian cloth in high-heat regions, works well. Avoid direct hot sun and strong wind exposure during the first 48 hours, which can cause rapid surface drying and shrinkage cracking.
Step 7 — Detail the junctions. Add drip grooves under window sills and parapet copings, and seal pipe penetrations and expansion joints with an appropriate sealant. This single step prevents the majority of “mystery leaks” that show up 1-2 years after otherwise good plaster work.
Coverage and Cost: What to Budget For
Coverage and pricing for ready mix waterproof plaster vary by brand, wall texture, and application thickness, but here’s a realistic planning range for Indian sites:
| Item | Typical Range |
|---|---|
| Application thickness | 12-15mm (single coat), up to 18-20mm (two-coat system) |
| Coverage per 40kg bag | Roughly 1.3-1.8 sq m per bag at 12mm thickness (varies by wall texture and wastage) |
| Material cost | Approximately ₹35-₹55 per sq ft for plaster material alone, depending on brand and thickness |
| Labour cost (application) | Approximately ₹18-₹30 per sq ft, depending on city and finish complexity |
| Total installed cost | Roughly ₹55-₹90 per sq ft, all-inclusive, for a standard single-coat exterior job |
| Curing period before painting | Minimum 7 days curing, plus 2-3 weeks total drying before applying exterior paint |
These figures are indicative planning ranges based on typical market rates — always confirm current pricing and exact coverage-per-bag figures against the specific product’s technical data sheet, since formulations and packaging sizes differ by brand and by region.
For perspective: re-plastering a damp, failed exterior wall (including removing old plaster, disposal, and redoing waterproofing) typically costs 2-3x more than doing it correctly the first time — which is the real financial argument for specifying proper waterproof plaster upfront rather than treating it as an optional upgrade.
Waterproof Plaster vs Other Options: Quick Comparison
| Method | Upfront Cost | Durability | Best For |
|---|---|---|---|
| Ready mix waterproof plaster | Medium | High (10-15+ years with proper detailing) | New construction, re-plastering, most residential/commercial exteriors |
| Site-mixed plaster + waterproofing compound | Medium-Low | Variable (depends on mixing accuracy) | Budget projects with experienced, well-supervised masons |
| Polymer-modified premium render | High | Very High | High-rise facades, architecturally exposed surfaces |
| Waterproof paint/coating over standard plaster | Low | Low-Medium (3-5 years before recoat) | Quick fixes, budget-constrained repainting cycles |
Common Mistakes to Avoid
Even good-quality waterproof plaster fails when these shortcuts are taken:
- Applying during or right before rain — fresh plaster needs a dry window to begin curing properly; rain within the first 24 hours can wash out surface material and compromise the waterproofing layer.
- Skipping the primer/bonding coat on smooth RCC surfaces — leads to delamination over time, especially on columns and beams cast with smooth shuttering.
- Under-curing to meet handover deadlines — the single biggest cause of premature cracking and reduced waterproofing performance.
- Ignoring plinth-level waterproofing — exterior plaster near ground level faces constant splash-back and rising dampness; this zone needs extra attention, sometimes an additional waterproof coating layer.
- Painting too early — applying exterior paint before the plaster has fully cured and dried traps residual moisture underneath, which shows up later as blistering.
Maintenance Tips to Extend Waterproofing Life
Even the best waterproof plaster benefits from basic upkeep:
- Inspect exterior walls before each monsoon season for hairline cracks and reseal them promptly — small cracks are cheap to fix, water damage behind them is not.
- Keep gutters and downspouts clear so water doesn’t run down and pool against wall surfaces.
- Reapply exterior waterproof paint or coating on its recommended cycle (commonly every 4-6 years) — the plaster provides the structural water resistance, but a good topcoat adds UV protection and an extra defensive layer.
- Address any efflorescence early; it’s usually a sign of ongoing moisture ingress somewhere, not just a cosmetic issue.
Regional Considerations: One Plaster Doesn’t Fit All Climates
India’s climate zones put very different demands on exterior plaster, and the right specification can shift depending on where the project sits.
Coastal regions (Mumbai, Konkan, Kerala, Chennai, Goa) face the toughest combination: high humidity year-round, salt-laden air, and intense monsoon rainfall over an extended season. Salt-air exposure accelerates efflorescence and can corrode embedded reinforcement faster if water gets in. Waterproof plaster here should be paired with extra attention to junction detailing and, ideally, a two-coat application for added protection margin.
High-rainfall interior regions (Western Ghats belt, North-East India) deal with less salt exposure but very heavy, sustained rainfall. The priority here is proper drainage detailing — drip mouldings, sloped sills — so water sheds off the wall quickly rather than sitting against the surface for hours during downpours.
Hot, dry regions (Rajasthan, parts of Gujarat, interior Maharashtra) see less rain overall, but large daily temperature swings that stress plaster through repeated thermal expansion and contraction. Curing is especially critical here, since hot, dry conditions cause plaster to lose surface moisture rapidly, leading to shrinkage cracks if not managed with extended curing and shade during application.
Pune and similar Deccan-plateau cities get a moderate but concentrated monsoon (roughly June to September) followed by a long dry spell — a cycle that specifically favours polymer-modified waterproof plaster, since the material needs to handle both saturated conditions and prolonged dry, UV-heavy exposure without losing flexibility.
If you’re specifying plaster for a project outside your usual region, it’s worth checking the product’s technical data sheet for any region-specific application notes, since curing times and recommended thickness can shift slightly with ambient humidity and temperature.
How to Verify You’re Actually Getting Waterproof-Grade Plaster
Not every plaster marketed with “waterproof” on the packaging performs the same way, and a few practical checks help separate genuine waterproof-grade products from a standard mix with a marketing label attached.
- Ask for the technical data sheet (TDS), not just the bag. A genuine waterproof plaster should list water absorption or permeability figures, recommended thickness, coverage per bag, and curing requirements — vague packaging with no technical figures is a red flag.
- Check for a visible additive/polymer content note. Waterproofing performance comes from the additive dosage; a reputable manufacturer will state that the product includes an integral waterproofing compound rather than just implying it.
- Request a sample water-absorption demonstration if the order size justifies it — a small test panel left to cure and then sprayed with water for a few minutes should show visibly reduced absorption compared to plain plaster on an adjacent panel.
- Confirm batch consistency. Factory ready mix plaster should perform the same from bag to bag; if a supplier can’t explain their quality control process, dosing accuracy on-site becomes a gamble.
- Match the product grade to the application. Some ranges offer different grades for interior vs exterior use — using an interior-grade plaster outdoors, even from a reputable brand, will not deliver the waterproofing performance the exterior needed.
Frequently Asked Questions
Is ready mix plaster automatically waterproof? No — only plaster specifically formulated with waterproofing or polymer additives is water-resistant. Standard ready mix plaster without these additives is still porous, so always confirm you’re specifying a waterproof-grade product, not just any ready mix plaster.
How much does waterproof plaster cost per square foot in India? Installed cost, including material and labour, typically ranges from around ₹55 to ₹90 per sq ft for a standard single-coat exterior application, depending on the brand, city, and finish. Two-coat systems and premium polymer-modified renders cost more.
How long does waterproof plaster last on exterior walls? With correct application, adequate thickness, and proper curing, waterproof plaster typically performs well for 10-15 years or more before requiring re-plastering, though junctions and exposed areas may need earlier spot maintenance.
Can waterproof plaster be applied directly over old, damp plaster? No — old, damaged, or damp plaster should be removed down to a sound substrate first. Applying new plaster over a failing layer just traps the existing moisture problem underneath and leads to faster failure.
What’s the minimum curing time for waterproof plaster before painting? A minimum of 7 days of active curing (keeping the surface moist) is required, followed by an additional 2-3 weeks of drying time before exterior paint is applied, to avoid trapping residual moisture.
Does waterproof plaster eliminate the need for exterior paint? No — waterproof plaster provides the primary structural water resistance, but exterior paint or an elastomeric coating adds UV protection and an additional water-shedding layer, and is still recommended for full protection and aesthetics.
Is waterproof plaster necessary in low-rainfall regions of India? It’s still recommended, since even low-rainfall regions face humidity cycles, occasional heavy showers, and temperature-driven cracking that standard plaster is vulnerable to — the cost difference versus standard plaster is usually small relative to the long-term maintenance savings.
Final Thoughts
Waterproof plaster isn’t a premium add-on for exterior walls in India — given the monsoon-to-dry-season cycle most of the country experiences, it’s closer to a baseline requirement for any wall expected to last a decade or more without repeated repair costs. The material matters, but application quality — surface prep, correct thickness, and proper curing — determines whether that waterproofing actually performs once the rains arrive.
If you’re specifying materials for a project or want coverage and pricing details for Gritolo’s Ready Mix Plaster for your specific wall area, get in touch with our team for a quote and technical data sheet.