Construction Material Application Guide: Step-by-Step Guide for Modern Building Projects
Construction materials play an important role in the quality, durability and appearance of a building. However, selecting a suitable material is only one part of the construction process. Proper application is equally important.
A high-quality construction material can fail to deliver the expected performance if the surface is poorly prepared, the mixing procedure is incorrect, the material is applied outside its recommended conditions or the installation process is not followed correctly.
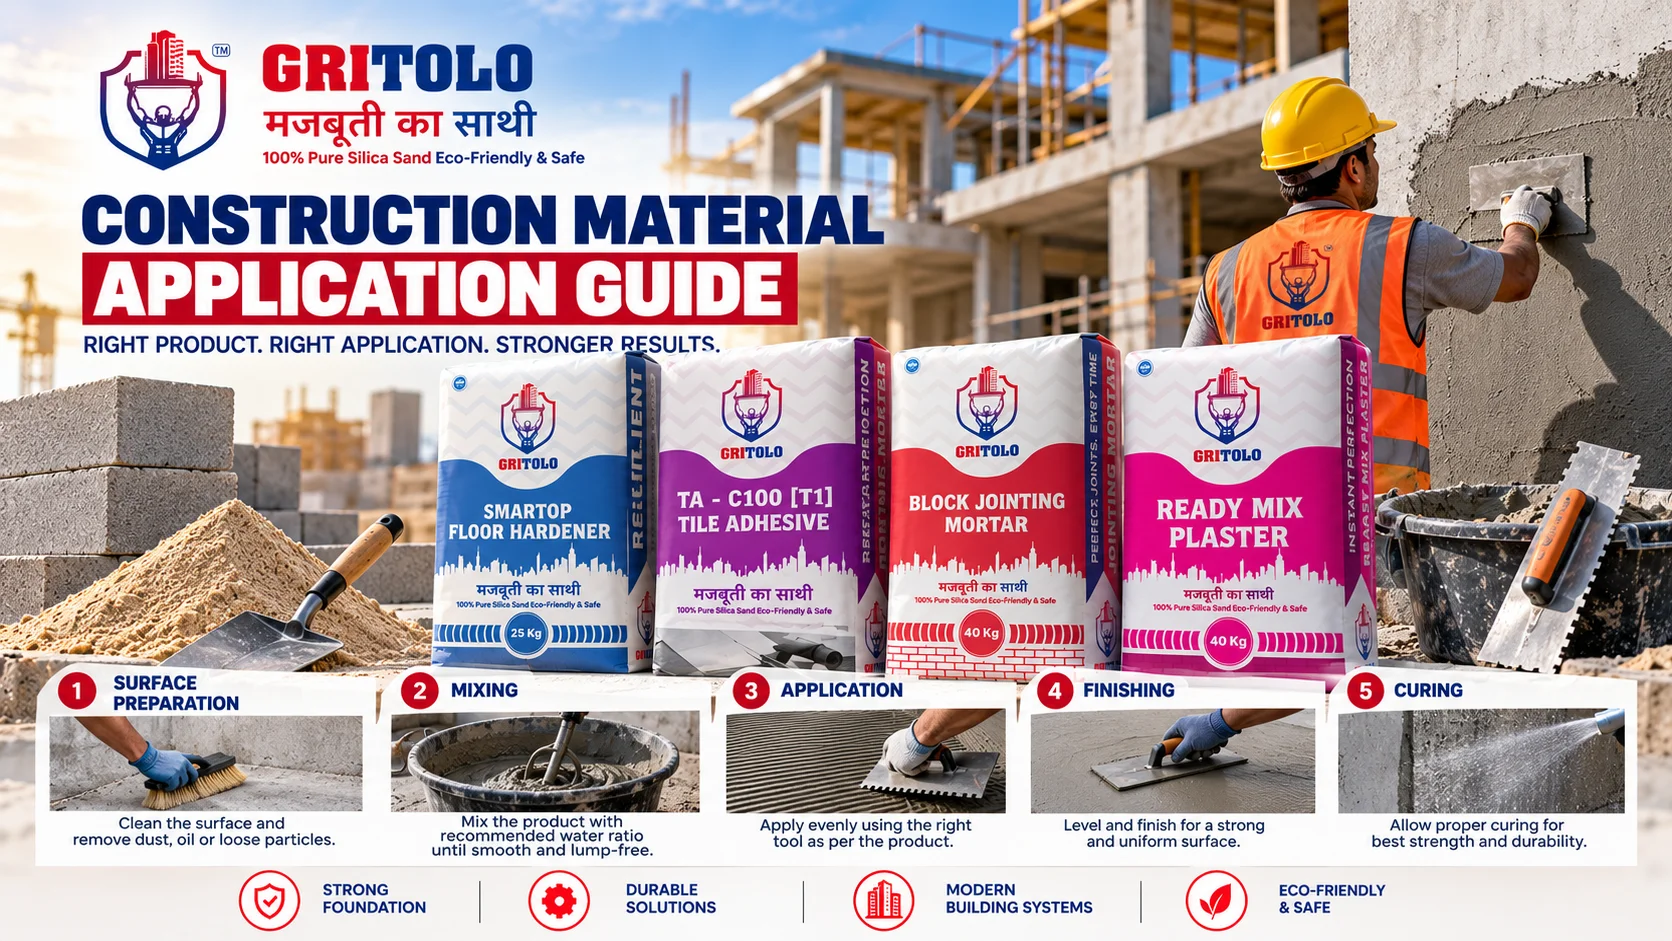
This Construction Material Application Guide explains the general principles behind applying commonly used construction materials, including ready mix plaster, tile adhesive, block jointing mortar, floor hardener and waterproof plaster.
The exact application procedure varies from product to product. Therefore, the manufacturer’s technical data sheet and project specifications should always take priority over general guidance.
What Is a Construction Material Application Guide?
A construction material application guide explains how a building material should be prepared, applied and finished for its intended purpose.
Depending on the material, an application guide may cover:
- Surface preparation
- Material storage
- Mixing
- Water requirements
- Application thickness
- Application tools
- Working time
- Finishing
- Curing or drying
- Cleaning
- Quality inspection
- Common application mistakes
The purpose is to help construction professionals understand the correct sequence of work.
A useful application process can generally be summarized as:
Inspect → Prepare → Measure → Mix → Apply → Finish → Cure/Dry → Inspect
However, not every construction material follows exactly the same procedure.
Why Proper Construction Material Application Matters
The performance of a construction material depends on more than its formulation.
Several factors can influence the final result.
Material quality
The product should be suitable for the intended application and stored according to its requirements.
Surface preparation
Dust, loose particles, oil, contamination or unsuitable substrate conditions can affect adhesion and finishing.
Mixing
Incorrect water quantity, mixing time or mixing equipment can affect consistency and application.
Application technique
The material needs to be applied using the recommended tools and method.
Environmental conditions
Temperature, humidity, wind, rain and direct sunlight can influence application and drying.
Workmanship
Even a technically suitable product requires appropriate installation practices.
This is why construction material application should be treated as a complete process rather than simply spreading or placing a product on a surface.
General Construction Material Application Process
Although every product is different, many construction materials follow a similar workflow.
Step 1: Understand the Product
Before beginning the work, read the product documentation.
Check:
- Intended application
- Suitable substrate
- Mixing instructions
- Coverage
- Application thickness
- Working time
- Drying or curing requirements
- Storage instructions
- Limitations
- Safety information
Do not assume that two products in the same category can be applied identically.
For example, different tile adhesives may have different requirements depending on the application and tile type.
Step 2: Inspect the Substrate
The substrate is the surface on which the material will be applied.
Depending on the project, it may be:
- Concrete
- Cement plaster
- Brickwork
- Blockwork
- Masonry
- Screed
- Existing flooring
- Wall surface
Inspect the substrate for:
- Cracks
- Loose material
- Dust
- Oil
- Grease
- Moisture
- Uneven areas
- Contamination
- Weak surfaces
Any substrate defects should be addressed before applying the construction material.
Step 3: Prepare the Surface
Surface preparation varies by material.
Typical preparation may involve:
- Removing dust and loose particles.
- Cleaning contamination.
- Repairing unsuitable areas.
- Correcting significant surface irregularities.
- Ensuring the substrate meets the product requirements.
- Following any required priming or dampening procedure.
Never assume that adding more material will compensate for a poor substrate.
Step 4: Measure the Material
Where a dry product requires mixing, use the recommended proportions.
Avoid estimating water or material quantities by eye when the product manufacturer provides a defined mixing procedure.
Consistent measurement can help improve consistency between batches.
Step 5: Mix Correctly
Mixing is particularly important for cement-based construction materials.
The general process may involve:
- Measuring the recommended water quantity.
- Adding the dry material according to the product instructions.
- Mixing using an appropriate tool.
- Allowing any specified resting period if required.
- Remixing according to the manufacturer’s instructions.
- Using the material within its specified working time.
Do not add additional water simply because the mixture appears difficult to apply unless the technical instructions specifically allow it.
Step 6: Apply the Material
Use the appropriate tools and technique for the material.
Application may involve:
- Trowel
- Notched trowel
- Plastering tools
- Screed
- Float
- Roller
- Brush
- Mechanical equipment
The correct application thickness is also important.
Applying too little material may affect coverage or performance, while applying too much can create unnecessary material consumption and potentially affect drying, shrinkage or finishing.
Step 7: Finish the Surface
Finishing requirements depend on the product.
For plaster, finishing may involve leveling and smoothing.
For tile adhesive, the installation involves positioning and adjusting the tiles.
For floor hardener, finishing is integrated into the concrete flooring process.
For waterproofing materials, the required coating or layer configuration depends on the system.
Follow the manufacturer’s recommended finishing procedure.
Step 8: Allow Appropriate Curing or Drying
Do not subject a newly applied material to service before the required curing, drying or setting period.
The required time depends on:
- Product type
- Temperature
- Humidity
- Substrate
- Thickness
- Ventilation
- Application conditions
Always follow the product-specific technical documentation.
Ready Mix Plaster Application Guide
Ready mix plaster is a factory-prepared plastering material used for suitable wall and surface finishing applications.
A general application sequence is outlined below.
1. Prepare the Wall
Remove:
- Dust
- Loose particles
- Oil
- Grease
- Weak material
- Other contaminants
The substrate should be suitable for the selected plaster.
2. Check Surface Condition
Inspect the wall for major unevenness, cracks or other defects.
Repair unsuitable areas before plastering.
3. Prepare the Plaster
Follow the manufacturer’s specified water-to-material ratio.
Mix until the material reaches the recommended consistency.
Avoid uncontrolled addition of water.
4. Apply the Plaster
Apply the plaster using suitable plastering tools.
Maintain the recommended thickness.
Where multiple coats are specified, follow the manufacturer’s instructions regarding thickness and timing.
5. Level the Surface
Use suitable tools to level the applied material.
Work consistently across the surface to achieve an even finish.
6. Finish the Surface
Finish the plaster according to the desired surface specification and product instructions.
7. Cure or Dry as Required
Follow the product’s recommended curing or drying procedure.
Important
Ready mix plaster products can differ significantly in formulation and intended application. Always check the specific product’s technical data sheet before application.
Tile Adhesive Application Guide
Tile adhesive requires careful substrate preparation and correct installation technique.
A general process includes the following steps.
Step 1: Inspect the Substrate
The surface should be:
- Clean
- Sound
- Stable
- Suitable for tiling
- Free from loose particles and contaminants
Step 2: Prepare the Adhesive
For powder-based products, mix the adhesive according to the manufacturer’s specified water quantity and mixing procedure.
Allow any required maturation period before remixing.
Step 3: Apply the Adhesive
Apply the adhesive using a suitable notched trowel or other recommended tool.
The appropriate trowel configuration depends on factors such as tile size, substrate condition and product requirements.
Step 4: Install the Tile
Place the tile onto the adhesive within the specified open time.
Move or adjust the tile as required to achieve proper contact.
Step 5: Maintain Joints
Use suitable spacers or an appropriate installation system where required to maintain consistent joints.
Step 6: Remove Excess Adhesive
Remove excess adhesive from joints before it hardens.
Step 7: Allow Setting
Do not expose the installation to traffic or other service conditions until the manufacturer’s specified setting period has been achieved.
How to Choose the Right Tile Adhesive
The appropriate tile adhesive depends on several factors.
Consider:
- Tile material
- Tile dimensions
- Tile weight
- Substrate
- Wall or floor application
- Indoor or outdoor application
- Moisture exposure
- Temperature
- Expected traffic
- Installation requirements
Gritolo’s tile adhesive range includes:
- TA-C100 [T1]
- TA-V200 [T2]
- TA-M300 [T3]
- TA-G400 [T4]
These products should be selected according to the relevant technical requirements and product documentation.
Block Jointing Mortar Application Guide
Block jointing mortar is used for suitable masonry block applications.
Correct application begins with the blockwork itself.
1. Check the Blocks
Blocks should be suitable for the selected mortar and reasonably clean.
Remove loose dust and unsuitable material where required.
2. Prepare the Mortar
Follow the product manufacturer’s specified mixing ratio.
Use clean water and appropriate mixing equipment.
3. Apply the Mortar
Apply the material according to the recommended joint thickness and installation method.
Avoid creating unnecessarily thick joints when the system is designed for controlled thin-bed application.
4. Position the Blocks
Place blocks carefully and maintain alignment.
Check:
- Level
- Vertical alignment
- Joint consistency
- Wall straightness
5. Correct the Block Position
Make adjustments within the product’s allowable working time.
Avoid disturbing the masonry after the material has begun setting.
6. Allow the Wall to Develop Adequate Strength
Follow the product and masonry-system requirements before loading, finishing or carrying out subsequent work.
Floor Hardener Application Guide
Floor hardener application is closely connected to the concrete flooring process.
The timing of application is therefore particularly important.
A general process includes:
1. Prepare the Concrete
The concrete mix, placement and finishing should follow the project specifications.
2. Monitor Concrete Condition
Floor hardener should be applied at the stage specified by the product and flooring system.
3. Apply the Floor Hardener
Distribute the recommended quantity uniformly over the suitable concrete surface.
4. Incorporate the Material
The floor hardener is worked into the concrete surface using suitable finishing equipment and techniques.
5. Finish the Floor
Continue finishing until the specified surface condition is achieved.
6. Cure the Floor
Curing should follow the concrete and flooring-system requirements.
Incorrect timing, uneven distribution or inappropriate finishing can affect the final floor.
For industrial projects, the required floor system should be selected based on expected traffic, abrasion, loading and operating conditions.
Waterproof Plaster Application Guide
Waterproof plaster or water-resistant plaster systems are used for suitable applications where moisture resistance is required.
However, waterproofing should be treated as a complete building-system consideration rather than relying on a single material.
General application process
Surface preparation
Remove loose material, dust and contaminants.
Repair defects
Cracks, holes and weak areas should be appropriately repaired.
Prepare the product
Follow the manufacturer’s mixing and application instructions.
Apply the first layer
Apply the recommended layer at the specified thickness.
Treat vulnerable areas
Pay particular attention to:
- Corners
- Joints
- Pipe penetrations
- Wall-floor intersections
- Openings
Apply additional layers if specified
Some systems require multiple coats or compatible waterproofing layers.
Protect the finished surface
Avoid premature exposure to water or mechanical damage.
Construction Material Application for Different Surfaces
Different substrates require different approaches.
Concrete Surfaces
Concrete surfaces should be checked for:
- Strength
- Cleanliness
- Surface profile
- Cracks
- Moisture
- Contamination
Brickwork
Brick surfaces may require appropriate preparation before plastering or finishing.
AAC Blocks
AAC block applications often use materials specifically designed for this type of masonry system.
Block jointing mortar should be selected according to the block manufacturer’s and mortar manufacturer’s recommendations.
Existing Tile Surfaces
Installing over existing tiles requires careful evaluation of adhesion, stability and compatibility.
Do not assume that every adhesive can be installed over existing tiles.
Common Construction Material Application Mistakes
1. Applying material to a dirty surface
Dust and contamination can interfere with adhesion and finishing.
2. Adding excessive water
More water does not necessarily make a cement-based product perform better.
Follow the specified mixing ratio.
3. Ignoring application thickness
Thickness requirements exist for a reason.
4. Mixing too much material
Prepare only an amount that can be used within the product’s working time.
5. Re-tempering incorrectly
Do not add water to partially set material unless explicitly permitted by the product instructions.
6. Ignoring weather conditions
Extreme heat, direct sunlight, rain, strong wind or high humidity can affect application.
7. Poor material storage
Moisture-sensitive products should be stored according to manufacturer instructions.
8. Using the wrong tool
Application tools influence coverage, thickness and finish.
9. Starting finishing work too early
Allow the material to reach the appropriate stage before finishing or subsequent work.
10. Ignoring manufacturer instructions
Generic construction practices cannot replace product-specific technical documentation.
How to Improve Construction Material Application Efficiency
Correct application can also improve construction efficiency.
Plan material quantities
Estimate material requirements before starting.
Organize the work area
Keep tools, water and materials accessible.
Train workers
Workers should understand the product-specific application method.
Maintain batch consistency
Use consistent measurement and mixing practices.
Reduce wastage
Avoid excessive mixing and uncontrolled application.
Inspect work continuously
Do not wait until the entire project is complete to identify application problems.
Document product usage
For larger projects, record:
- Product batch
- Application area
- Material quantity
- Mixing procedure
- Application date
- Site conditions
- Installer/team
This can help with quality control and troubleshooting.
Construction Material Application Checklist
Before starting work, use this checklist:
Product
- Correct product selected
- Technical data sheet reviewed
- Product within usable shelf life
- Packaging intact
- Storage requirements followed
Surface
- Substrate inspected
- Surface cleaned
- Loose material removed
- Defects repaired
- Compatibility confirmed
Mixing
- Correct water quantity measured
- Correct material quantity measured
- Suitable mixing equipment used
- Recommended mixing time followed
Application
- Correct tools available
- Correct thickness maintained
- Working time observed
- Environmental conditions checked
- Application method followed
Finishing
- Surface finished correctly
- Excess material removed
- Joints checked
- Curing/drying requirements followed
- Final inspection completed
Frequently Asked Questions
What is a construction material application guide?
A construction material application guide explains how a building material should be prepared, mixed, applied, finished and cured or dried according to its intended use.
Why is surface preparation important?
Surface preparation helps ensure that the substrate is clean, sound and suitable for the selected material. Poor preparation can negatively affect adhesion, finishing and long-term performance.
How should construction materials be mixed?
Mixing procedures depend on the product. Follow the manufacturer’s specified material-to-water ratio, mixing equipment, mixing time and working procedure.
Can I use the same application method for every construction material?
No. Ready mix plaster, tile adhesive, block jointing mortar, floor hardener and waterproofing materials have different application requirements.
How do I apply ready mix plaster?
Generally, the surface is prepared first, the ready mix plaster is mixed according to the manufacturer’s instructions, applied at the specified thickness, leveled and finished, followed by the required curing or drying procedure.
How do I apply tile adhesive?
Prepare the substrate, mix the adhesive according to its instructions, spread it using the recommended trowel, install the tiles within the specified open time and allow the installation to set according to the product requirements.
How do I apply block jointing mortar?
Prepare suitable blocks, mix the mortar according to the manufacturer’s instructions, apply it at the recommended joint thickness, position and align the blocks, and allow the masonry system to develop adequate strength before subsequent work.
When should floor hardener be applied?
Floor hardener application timing depends on the concrete condition and product requirements. It should be incorporated into the concrete floor at the stage specified by the manufacturer and flooring system.
Can waterproof plaster replace a complete waterproofing system?
Not necessarily. Moisture protection depends on the building design, substrate, detailing, drainage and selected waterproofing system. A plaster product should not automatically be considered a complete waterproofing solution.
How can construction material wastage be reduced?
Wastage can be reduced through accurate quantity estimation, appropriate storage, correct mixing, trained application, proper handling and continuous quality control.
Why should manufacturers’ instructions be followed?
Construction materials differ in composition, intended use and performance requirements. Product-specific instructions provide the appropriate mixing, application, thickness, drying and storage requirements.
Conclusion
Correct application is one of the most important parts of achieving the expected performance from construction materials.
Whether you are working with ready mix plaster, tile adhesive, block jointing mortar, floor hardener or waterproof plaster, the basic principles remain important: understand the product, inspect the substrate, prepare the surface, measure correctly, mix according to instructions, apply using the appropriate method and allow sufficient setting, curing or drying time.
However, general guidance should never replace product-specific technical documentation.
For residential, commercial and industrial construction, a systematic application process can help improve consistency, reduce avoidable wastage and support better finishing quality.
GRITOLO GLOBAL INDIA PRIVATE LIMITED provides construction-material solutions including tile adhesives, ready mix plaster, block jointing mortar and floor finishing products for modern construction applications.
For product-specific application requirements, consult the relevant Gritolo product information and technical documentation before beginning work.