Glass Mosaic Tile Adhesive: The Complete Guide to Choosing, Using & Getting Perfect Results (2026)
Quick Answer: The best adhesive for glass mosaic tiles is a white, polymer-modified cementitious tile adhesive — specifically a Type 2 (T2) or Type 3 (T3) flexible adhesive. White adhesive is essential because glass tiles are translucent and grey adhesive shows through, ruining the appearance. For wet areas such as bathrooms and swimming pools, choose a flexible, waterproof-grade adhesive. Gritolo’s TA–V200 and TA–G400 adhesives are purpose-engineered for glass mosaic tile applications.
Whether you are tiling a feature wall in your living room, a bathroom splash-back, a swimming pool surround, or a kitchen backsplash, glass mosaic tiles are one of the most visually stunning choices available. But here is what most people do not realise until it is too late: glass mosaic tiles demand a specific type of adhesive. Use the wrong one and you will end up with grey patches showing through your tiles, tiles slipping during application, or — worst of all — tiles falling off the wall months later.
This guide covers everything you need to know about glass mosaic tile adhesive: what to buy, why it matters, how to apply it correctly, and how to avoid the most common (and costly) mistakes. Read on — your tiles deserve to be done right.
What You’ll Find in This Guide
- What makes glass mosaic tiles different from standard tiles
- Why the wrong adhesive will ruin your project
- How to choose the best glass mosaic tile adhesive
- White adhesive vs grey adhesive — does colour matter?
- Step-by-step application guide for glass mosaic tiles
- Best adhesive for glass mosaic tiles in bathrooms and wet areas
- Best adhesive for glass mosaic tiles on swimming pool walls
- Common mistakes and how to avoid them
- Long-tail questions answered: what people actually search
- Gritolo’s adhesive range for glass mosaic tiles
- Frequently Asked Questions
- Author Bio
What Makes Glass Mosaic Tiles Different — and Why It Matters for Adhesive Choice
If you have ever asked yourself “can I just use any tile adhesive for glass mosaic tiles?”, the answer is a firm no — and understanding why will save you a great deal of frustration.
Glass mosaic tiles behave differently from ceramic, porcelain, or natural stone tiles in several important ways:
- Translucency: Glass tiles are partially or fully see-through. Whatever adhesive you apply beneath them will be visible through the tile. Grey adhesive creates a dull, dirty appearance behind white or light-coloured glass tiles — a problem that is impossible to fix once the adhesive has set.
- Non-porous surface: Unlike ceramic tiles, glass is completely non-porous. It cannot absorb any adhesive into its surface, which means the bond is entirely dependent on contact adhesion. This makes the quality and coverage of the adhesive application critically important.
- Thermal expansion: Glass expands and contracts more noticeably with temperature changes than most other tile materials. An inflexible adhesive will crack under this movement, leading to debonding and tile loss over time.
- Lower weight per tile: Glass mosaic tiles are typically small and light. If the adhesive has poor initial grab, tiles will slip during installation — especially on vertical walls. Adhesives with a higher initial tack are essential.
- Mesh-mounted sheets: Most glass mosaic tiles are sold on mesh-backing sheets rather than individually. The adhesive must penetrate through the mesh backing to make full contact with the glass tile surface. Insufficient coverage is a very common cause of failure.
These five characteristics combined explain why glass mosaic tile adhesive is a specialist category — not simply a variation on standard tile adhesive.
Why Using the Wrong Adhesive Will Ruin Your Project
This is the section most DIY guides skip — and it is arguably the most important one.
Using an inappropriate adhesive for glass mosaic tiles does not just reduce performance. It can completely ruin an installation that took hours or days of skilled work. Here is what goes wrong when the wrong adhesive is used:
Grey Show-Through
Standard cementitious tile adhesives are grey in colour. Because glass tiles are translucent, the grey adhesive is clearly visible through the tile surface — particularly with white, cream, silver, or light-coloured glass mosaics. The result is a muddy, discoloured appearance that looks nothing like the tile sample you selected in the showroom. There is no way to fix this once the adhesive has cured; the only remedy is complete removal and re-installation.
Poor Bond on Non-Porous Surfaces
Standard adhesives are formulated to partially penetrate the surface of the tile for mechanical adhesion. On a non-porous glass surface, this mechanism does not work. Adhesives without adequate polymer content will simply not bond reliably to glass, leading to tiles that feel hollow when tapped, or that detach from the wall weeks after installation.
Tile Slippage on Vertical Surfaces
Glass mosaic tiles on walls need an adhesive with good initial grab (sometimes called “non-slip” or “anti-slip” performance). Without this, tiles — particularly on mesh-mounted sheets — slide downward under their own weight before the adhesive sets. Even small amounts of movement can create visible misalignment in the finished installation.
Cracking and Debonding Over Time
In areas with temperature variation (external walls, rooms with underfloor heating, swimming pool surrounds), an inflexible adhesive will crack as the glass tiles expand and contract. Flexible adhesives — those with added polymer modifiers — absorb this movement elastically, maintaining the bond over many years.
How to Choose the Best Glass Mosaic Tile Adhesive
Knowing what to look for makes the decision straightforward. Here are the key criteria to evaluate:
1. Colour: Always Choose White Adhesive for Glass Mosaic Tiles
This is non-negotiable. White adhesive ensures that the natural colour of the glass tile — including its reflective and translucent properties — is fully preserved. It is the foundation of a professional-looking glass mosaic installation. Do not be tempted by grey adhesive even if it is cheaper or more convenient. The visual difference is immediately apparent and permanent.
2. Polymer Modification (Flexibility)
Look for adhesives labelled as “polymer-modified” or “flexible.” The polymer content achieves two things: it improves adhesion to non-porous surfaces like glass, and it gives the cured adhesive a degree of flexibility that accommodates thermal movement. In India’s climate — with significant temperature swings between seasons — this flexibility is particularly important for external applications and swimming pool installations.
3. Adhesive Classification: T2 or T3 Grade
International and BIS standards classify tile adhesives by performance. For glass mosaic tiles, a minimum of Type 2 (T2) — improved cementitious adhesive — is recommended. For demanding applications such as swimming pools, facades, and large-format installations, Type 3 (T3) — highly polymer-modified — is the professional specification.
4. Non-Slip / Initial Grab
For wall installations, choose an adhesive with non-slip or reduced slippage characteristics. This is particularly important for glass mosaic sheets, which can shift if the adhesive does not grip immediately upon contact. Many premium adhesives include this as a standard feature; check the product data sheet if you are unsure.
5. Open Time
Open time is how long the adhesive remains workable after application before it skins over and loses adhesion. For mosaic tiles, a longer open time (45–60 minutes) is beneficial, as the positioning of mesh-mounted sheets requires careful alignment. Working in sections is good practice regardless of open time.
6. Coverage Rate
Glass mosaic tiles require full adhesive coverage — ideally 95–100% contact between tile and substrate. This means applying the adhesive in a thin, even layer and pressing the tile firmly to collapse the notch ridges completely. Choose an adhesive with a fine, smooth consistency for mosaic applications.
Quick Comparison: Adhesive Types for Glass Mosaic Tiles
| Adhesive Type | Colour | For Glass Mosaic? | Wet Areas? | Swimming Pools? |
| Standard Grey Cement | Grey | Not recommended | NO | NO |
| White Cement Adhesive (T1) | White | Acceptable (dry areas only) | Limited | NO |
| White Polymer T2 – | White | Yes | Yes | With |
| e.g. TA–V200 | NA | Recommended | NA | membrane |
| White Flexible T3 – e.g. TA–G400 | White | Best choice | Excellent | Recommended |
| Epoxy Adhesive | Clear/White | Premium use | Excellent | Excellent |
As the table shows, a white, polymer-modified adhesive in T2 or T3 grade is the right choice for the vast majority of glass mosaic tile applications. Epoxy adhesive offers outstanding performance but at a considerably higher cost and with greater application complexity — it is best reserved for swimming pool interiors and highly demanding commercial projects.
White Adhesive vs Grey Adhesive for Glass Mosaic Tiles: Does Colour Really Matter?
The short answer is: absolutely yes. Here is a closer look at why colour is so important when bonding glass mosaic tiles.
Glass mosaic tiles are manufactured to be visually striking. Their appeal lies in their ability to reflect light, create depth, and produce vibrant colour or crisp, clean whites and neutrals. This visual effect is entirely dependent on what is beneath the tile being neutral or white.
When grey adhesive is used under translucent or semi-translucent glass tiles, the following issues arise:
- The tile appears duller than the showroom sample
- White or silver tiles take on a grey or bluish tinge
- Colour variations in the adhesive layer create patchy, uneven appearance across the installation
- The reflective quality of the glass is reduced, making the surface look flat and unattractive
Professional tilers across India and globally specify white adhesive as the standard for all glass mosaic tile work — it is not a premium extra but a basic requirement. Gritolo’s range of white tile adhesives is formulated precisely for this application.
Step-by-Step: How to Apply Glass Mosaic Tile Adhesive
Getting the application right is just as important as choosing the right adhesive. Follow this process for a professional, long-lasting finish.
Step_1 — Prepare the Surface
The substrate must be clean, dry, flat, and free from dust, oil, paint, or any loose material. For new plasterwork, allow a minimum of four weeks curing time before tiling. Check the wall for flatness using a spirit level — any variation greater than 3mm over a 2-metre span should be corrected before tiling begins. Sand or grind down high spots and fill hollows with a suitable levelling compound.
Step_2 — Plan Your Layout
Before applying any adhesive, dry-lay the mosaic sheets on the floor to plan the layout. Mark a horizontal datum line on the wall using a spirit level. This line will keep your sheets perfectly level as you work. Identify any cuts that will be needed at edges and corners, and plan for symmetrical spacing wherever possible.
Step_3 — Mix the Adhesive
Add the adhesive powder to clean, cold water in the specified ratio (check your product data sheet). Mix with a slow-speed electric mixer until a smooth, lump-free consistency is achieved. Allow the mix to rest (slake) for three to five minutes, then remix briefly. Never add more water after slaking — this weakens the adhesive.
Step_4 — Apply the Adhesive to the Wall
Using a notched trowel (a 3mm V-notch or 4mm square-notch is typically recommended for mosaic tiles), apply the adhesive to a manageable section of the wall — no more than 0.5 to 1 square metre at a time. Hold the trowel at approximately 45 degrees to create consistent, even ridges. Work from your datum line upward.
Step_5 — Back-Butter the Mosaic Sheet (Where Required)
For glass mosaic tiles with mesh backing, it is often beneficial to also apply a thin skim of adhesive to the back of the sheet (back-buttering). This ensures maximum contact between the adhesive and the glass surface, which is critical given the non-porous nature of glass. Use a rubber grout float or the flat side of a trowel to spread a thin, even layer.
Step_6 — Position and Press the Sheet
Place the mosaic sheet onto the adhesive, aligning it carefully with your datum line and adjacent sheets. Use a rubber mallet or a beating block (a flat piece of timber covered with rubber) to firmly press the entire sheet into the adhesive with even pressure. This collapses the adhesive ridges and ensures full contact across the sheet. Work from the centre outward to push out any air pockets.
Step_7 — Check Coverage
Periodically remove a sheet from the wall within the first few minutes of application to check adhesive coverage. You should see even adhesive transfer across the entire back surface of the tiles. If coverage is low (less than 85%), adjust your trowel size or back-buttering technique before continuing.
Step_8 — Remove Paper Facing (if applicable)
Some mosaic sheets use paper facing on the front rather than mesh backing. After pressing the sheets into position, lightly dampen the paper facing with a sponge and water, wait two to three minutes for the paper to release, then carefully peel away. The tiles should remain perfectly in position. Adjust any misaligned tiles immediately using a grout float.
Step_9 — Allow to Set
Allow the adhesive to set for a minimum of 24 hours before grouting — longer in humid or cool conditions. Do not walk on floor installations or apply pressure to wall installations during this period. Keep the installation protected from direct sunlight, which can dry the adhesive too rapidly and compromise cure quality.
Step_10 — Grout
For glass mosaic tiles, use a fine, unsanded grout in a colour that complements your tiles. Apply with a rubber grout float, working diagonally across the joints to avoid pulling grout out of the lines. Clean excess grout from the tile surface with a damp sponge before it begins to harden. Polish to a shine with a dry cloth once the grout has dried.
Best Adhesive for Glass Mosaic Tiles in Bathrooms
Bathrooms are the most common location for glass mosaic tiles — and also one of the most demanding environments for any adhesive. Persistent moisture, steam, temperature variation, and the constant presence of water make the adhesive choice particularly important.
For bathroom glass mosaic tile installations, look for an adhesive that meets all of the following criteria:
- White in colour — essential for translucent glass tiles
- Polymer-modified — for adhesion to non-porous glass
- Water-resistant or waterproof-grade — to withstand persistent humidity and direct water exposure
- Flexible — to accommodate the thermal movement characteristic of bathroom environments
- Non-slip — to prevent tile sheets from slipping on vertical walls during installation
Gritolo’s TA–V200 [T2] Tile Adhesive meets all of these criteria and is a trusted choice for bathroom glass mosaic installations across India. For high-moisture shower enclosures and wet room applications, the premium TA–G400 [T4] is recommended. See Gritolo’s full tile adhesive range on the Gritolo Shop page.
Tip: Always apply a suitable waterproofing membrane to the shower enclosure walls before tiling. The adhesive and grout are water-resistant but not a substitute for proper waterproofing in high-exposure zones. For more on waterproofing wall systems, read our guide to Water-Resistant Ready Mix Plaster.
Best Adhesive for Glass Mosaic Tiles in Swimming Pools
Swimming pool glass mosaic installations represent the most demanding adhesive application. Pools expose tiles and adhesives to permanent submersion, chemical treatment (chlorine, saline), hydrostatic pressure, and frequent temperature variation. Failure of any component of the tile fixing system in a swimming pool is costly to repair and visually disruptive.
For swimming pool glass mosaic installations, the specification should include:
- A white, highly polymer-modified flexible adhesive (T3 grade minimum)
- A cementitious waterproofing membrane applied to the pool shell before tiling
- Movement joints at regular intervals (typically every 3–4 metres) to accommodate structural movement
- A flexible, water-resistant epoxy or cementitious grout for the joints
For swimming pool applications, consider Gritolo’s TA–G400 [T4] Tile Adhesive or epoxy-based adhesive solutions. We have written a detailed guide specifically covering this topic: Epoxy Tile Adhesive for Swimming Pools — highly recommended reading before specifying any pool tiling project.
FAQ
Q1. Can I use normal tile adhesive for glass mosaic tiles?
A1. No — not reliably. Normal grey cement tile adhesives are not suitable for glass mosaic tiles. They lack sufficient polymer content for adhesion to non-porous glass, they will show through translucent tiles, and they do not offer the flexibility needed to accommodate glass tile movement. Always use a white, polymer-modified adhesive specified for glass mosaic.
Q2. Which adhesive is best for glass mosaic tiles on walls?
A2. A white, polymer-modified flexible tile adhesive in T2 or T3 grade is the professional recommendation for glass mosaic tiles on walls. Products like Gritolo TA–V200 or TA–G400 are purpose-built for this application and deliver reliable performance on bathroom walls, feature walls, and kitchen backsplashes.
Q3. How do I fix glass mosaic tiles in a bathroom?
A3. Prepare the surface thoroughly, use a white polymer-modified adhesive applied with a 3–4mm notched trowel, back-butter mesh-mounted sheets for full coverage, press firmly with a rubber mallet, and allow 24 hours to set before grouting. Always ensure the substrate is waterproof in wet zones.
Q4. What size notched trowel for glass mosaic tiles?
A4. For standard glass mosaic sheets (typically 300x300mm), a 3mm V-notch or 4mm square-notch trowel is recommended. This provides sufficient adhesive depth without creating excess squeeze-out through the mesh joints. For larger format mosaic tiles or uneven substrates, a 6mm notch may be more appropriate.
Q5. How long should tile adhesive dry before grouting glass mosaic tiles?
A5. Allow a minimum of 24 hours at 20–25°C before grouting glass mosaic tiles. In humid conditions or low temperatures, allow 48 hours. Do not rush the grouting stage — if the adhesive has not fully set, grouting can displace tiles and compromise the installation.
Q6. Can glass mosaic tiles be installed outdoors?
A6. Yes, but it requires careful product selection. Use an external-grade flexible adhesive (T3) and ensure the adhesive is specified for freeze-thaw resistance if the location experiences cold winters. Movement joints are essential in outdoor installations. Consult Gritolo’s technical team for external glass mosaic project specifications.
Q7. Why are my glass mosaic tiles falling off the wall?
A7. The most common causes are: incorrect adhesive type (grey or non-flexible); insufficient adhesive coverage (less than 85% contact); substrate that was not properly prepared; or grouting before the adhesive had fully set. In some cases, the substrate itself is the problem — plaster that is not fully cured will not provide adequate anchorage.
Common Mistakes When Installing Glass Mosaic Tiles (And How to Avoid Them)
- Using grey adhesive: Always use white. No exceptions for glass mosaic tiles.
- Not back-buttering: On mesh-mounted sheets, skipping the back-butter step leaves gaps in adhesive coverage that lead to hollow tiles and eventual debonding.
- Working too large a section: Apply adhesive to no more than 0.5–1m² at a time. Adhesive that skins over before the tile is pressed will not bond correctly.
- Skipping alignment checks: Mosaic sheets must be aligned carefully. Use a spirit level at each row and step back regularly to view the installation from a distance.
- Not using spacers at sheet joints: Leave a consistent grout joint between adjacent sheets. Many mesh-mounted sheets are sized to include this joint when sheets are butted up, but check before you start.
- Rushing the grout: Grouting before the adhesive has fully set can cause tiles to be displaced. Patience is essential.
- Using the wrong grout: For glass mosaic tiles with fine joints (typically 1–2mm), use an unsanded fine-particle grout. Sanded grout can scratch the glass surface.
- Neglecting movement joints: In all installations larger than 4m², include movement joints (filled with flexible sealant, not grout) at perimeter edges and intermediate points. This is especially critical in pools and outdoor areas.
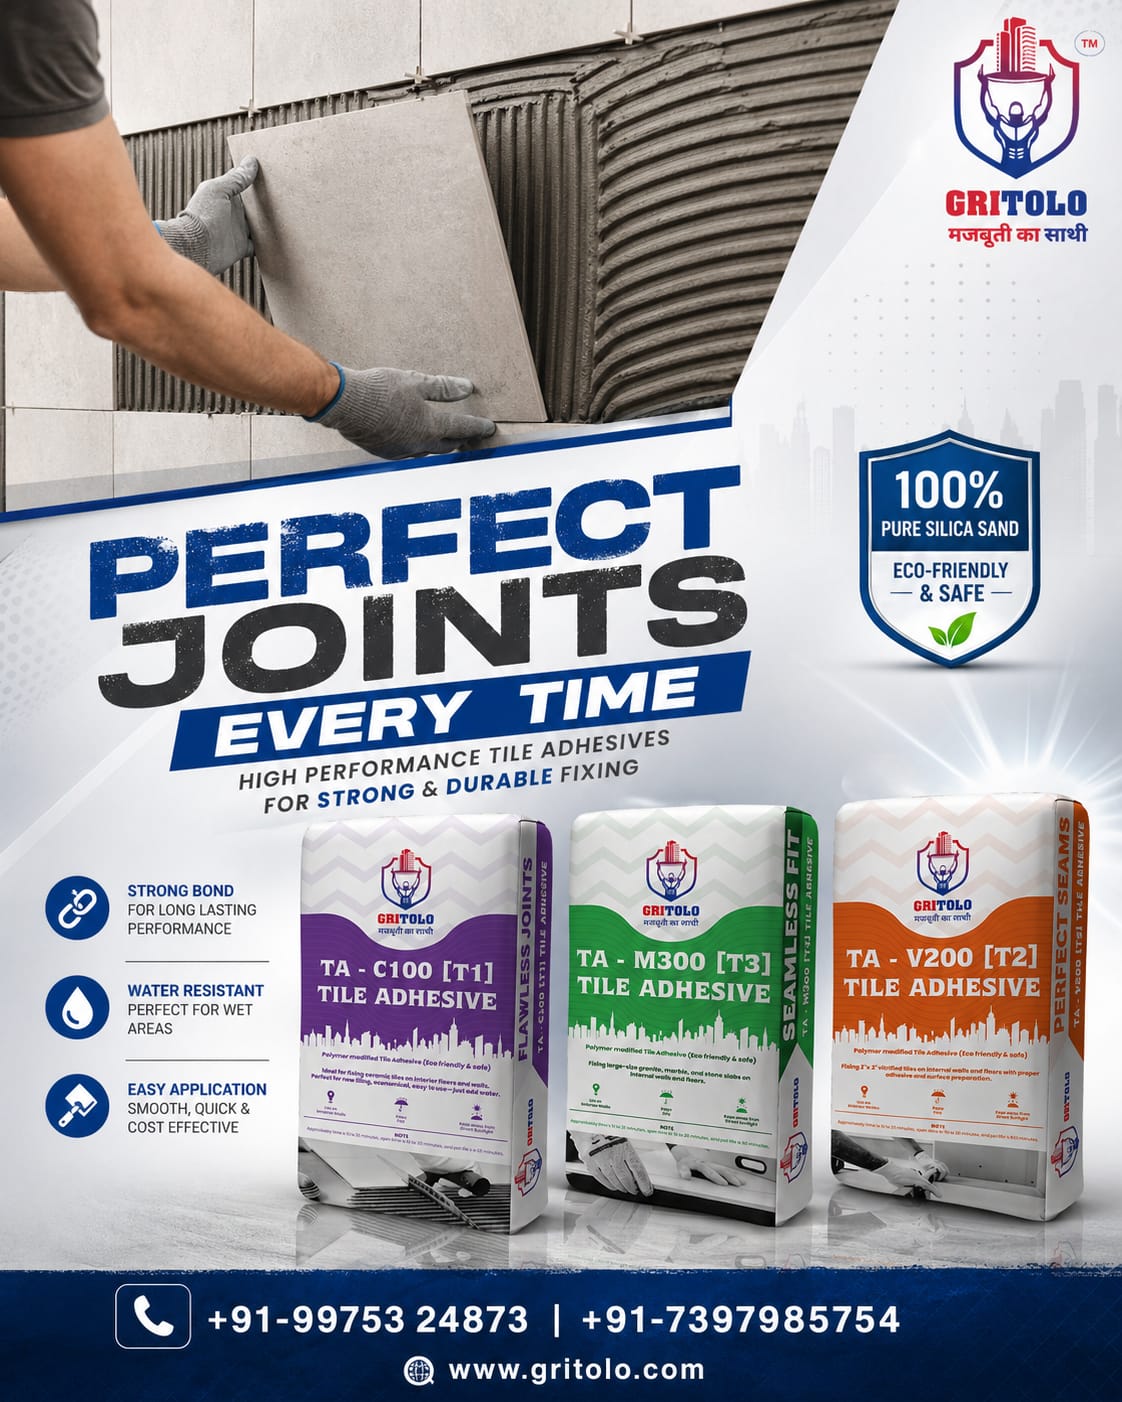
Gritolo’s Tile Adhesive Range for Glass Mosaic Tiles
At Gritolo Global India Private Limited, we manufacture a comprehensive range of tile adhesives designed to meet the full spectrum of construction demands across India’s diverse climate zones. Here is how our range maps to glass mosaic tile applications:
| Product | Grade | Best For | Mosaic Suitability |
| TA–C100 [T1] | T1 Standard | Internal dry wall tiles | Not recommended for glass |
| TA–V200 [T2] | T2 Improved | Bathrooms, kitchens, feature walls | Glass mosaic – dry & wet areas |
| TA–M300 [T3] | T3 Highly Modified | Wet rooms, facades, floors | Excellent – demanding applications |
| TA–G400 [T4] | T4 Premium Flex | Pools, external, large format | Best – pools & outdoor |
All Gritolo tile adhesives in the T2 grade and above are available in white formulation, making them fully compatible with glass mosaic tile applications. Our products are manufactured in our Pune facility under rigorous quality management systems, with every batch tested for bond strength, open time, and consistency before dispatch.
Explore our full tile adhesive range: gritolo.com/shop
When Choosing a Construction Supplier
If you are researching tile adhesives online, you will encounter hundreds of products and opinions. How do you know whose advice to trust? The answer lies in the principles of Experience, Expertise, Authoritativeness, and Trustworthiness — the same criteria Google uses to evaluate content quality.
At Gritolo, our editorial team comprises construction materials specialists, civil engineers, and experienced tiling professionals who work directly with our products on real projects every day. The guidance in this article is not drawn from generic industry text — it reflects the accumulated knowledge of a team that has supported thousands of construction projects across India, from residential bathrooms to Olympic-standard swimming pools.
Our products are manufactured in India, tested to BIS standards, and backed by technical data sheets that are available on request for every product in our range. When you specify Gritolo, you are working with a manufacturer that takes product quality and technical honesty seriously.
Related Guides on the Gritolo Blog
If you found this guide useful, you will also benefit from reading these related articles:
- Epoxy Tile Adhesive for Swimming Pools: The Ultimate 2026 Guide [/epoxy-tile-adhesive-for-swimming-pools]
- Water-Resistant Ready Mix Plaster: Complete Guide for Builders & Homeowners [/water-resistant-ready-mix-plaster]
- Sand-Free Plaster Benefits: The Ultimate Guide for Modern Construction [/sand-free-plaster-benefits]
- Browse the full Gritolo tile adhesive range [/shop]
Get the Foundation Right
Glass mosaic tiles are a beautiful, timeless choice — but their visual impact depends entirely on the quality of the installation beneath them. The adhesive you choose is not a background detail; it is the foundation of a finish you want to last for decades.
Choose white. Choose polymer-modified. Choose the right grade for your application. And when in doubt, speak to the people who manufacture the adhesive and understand it best.
Gritolo is committed to helping builders, contractors, architects, and homeowners across India make confident, informed choices. Our tile adhesive range is designed for real Indian projects — from humid coastal bathrooms to monsoon-exposed facades to heated swimming pools. Every product is backed by technical expertise and a genuine commitment to your project’s success.
Ready to order or need a technical recommendation? Visit gritolo.com/shop or call our team on +91 7397985754. We are here to help you get it right, the first time.
About the Author
Gritolo Editorial Team
Construction Materials Specialists | Gritolo Global India Private Limited
The Gritolo Editorial Team is composed of civil engineers, construction materials technologists, and experienced tiling and plastering professionals based at our Pune headquarters. With direct involvement in the development, testing, and technical support of Gritolo’s product range — including tile adhesives, ready mix plasters, block jointing mortars, and floor hardeners — our team brings hands-on, project-level expertise to every guide we publish. Our content is written for people who are actually building things: contractors, architects, site managers, and homeowners who need accurate, practical information they can act on. All product recommendations reflect genuine technical assessment against real-world Indian construction conditions.
📍 Pune, Maharashtra, India | 🌐 gritolo.com | 📞 +91 7397985754