Vertical Wall Cladding Adhesive: The Complete Guide to Choosing, Applying & Perfecting Your Finish (2026)
Quick Answer: The best adhesive for vertical wall cladding is a polymer-modified, flexible cementitious tile adhesive — C2TE or C2TES1 grade — applied in full-coverage bed method. For stone, brick slips, and porcelain cladding panels, use a high-grab, non-slip white or grey adhesive depending on the material. For external facades and wet areas, choose a waterproof-grade flexible adhesive. Epoxy adhesive is recommended for submerged or chemically exposed surfaces. Gritolo manufactures high-performance cladding adhesives for every vertical wall application across India.
Vertical wall cladding transforms the look of any building — inside or out. Whether you are fixing stone slips to a lounge feature wall, installing porcelain panels on an external facade, or applying brick-effect cladding to a commercial reception, the finish is only as good as the adhesive holding it in place.
Most people spend hours choosing their cladding. Very few spend enough time choosing the adhesive. That imbalance is why cladding tiles slide during installation, why panels delaminate after the first monsoon, and why beautiful stone features crack and fall away within two years of being installed.
This guide changes that. It covers every aspect of vertical wall cladding adhesive — what to buy, why it matters, how to apply it correctly, and how to avoid the mistakes that cost time and money to fix. Whether you are a contractor, an architect specifying for a project, or a homeowner planning a renovation, this is the guide you need before you start.
What You Will Find in This Guide
- Why vertical surfaces demand specialist adhesive
- Types of cladding adhesive and which to choose
- Choosing adhesive by cladding material type
- Indoor vs outdoor wall cladding adhesive
- Substrate guide: which adhesive for which wall
- Step-by-step application guide for vertical wall cladding
- Long-tail questions answered — what people actually search
- Common mistakes and how to avoid them
- Gritolo’s cladding adhesive range
- FAQ schema section
- Author bio
Why Vertical Surfaces Demand Specialist Adhesive
Gravity is your first enemy when fixing cladding to vertical walls. Standard tile adhesives are formulated for floor installations where gravity helps press tiles into the adhesive bed. On vertical surfaces, it does the opposite — it pulls tiles away from the wall before the adhesive has set.
This fundamental difference is why vertical wall cladding adhesive must have three properties that standard floor adhesives do not need to the same degree:
1. High Initial Grab (Non-Slip)
Non-slip or anti-slip adhesive — sometimes labelled ‘T’ (no slippage) in EN 12004 classification — resists the downward movement of heavy cladding panels the moment they are pressed onto the wall. Without this, panels slide, joints open up, and your alignment is ruined before the adhesive has even begun to set. For stone slips, brick slips, and heavy porcelain cladding, non-slip performance is non-negotiable.
2. High Bond Strength
Vertical surfaces create a sustained tensile load on the adhesive as the weight of the cladding constantly pulls on the bond line. A minimum adhesive tensile strength of 1.0 N/mm² is the professional benchmark for wall cladding — higher for heavier materials and external applications. Polymer-modified adhesives consistently outperform standard cement adhesives in tensile bond strength, which is why they are the standard specification for all cladding work.
3. Flexibility (Deformation Class S1 or S2)
Cladding panels — particularly on external facades — expand and contract with daily and seasonal temperature changes. An inflexible adhesive will crack under this movement, allowing water to penetrate behind the cladding and triggering debonding. Flexible adhesives (classified S1 for 2.5mm deformation, S2 for 5mm) absorb this movement and maintain the bond over the life of the installation.
On large external facades in India — where surface temperatures can swing from 12°C on winter mornings to 55°C+ on summer afternoons in states like Rajasthan and Gujarat — the S1 or S2 deformation classification is not a premium extra. It is the minimum responsible specification.
Types of Vertical Wall Cladding Adhesive
Understanding the main adhesive categories helps you make the right choice for your specific project. Here is a clear breakdown:
Polymer-Modified Cementitious Adhesive (C2 Grade)
This is the professional standard for the vast majority of vertical wall cladding applications. C2-grade adhesive contains polymer additions that significantly improve bond strength, flexibility, and open time compared to standard C1 cement adhesive. Available in white or grey, with or without non-slip (T) and flexibility (S1/S2) characteristics. White is required for light-coloured or translucent cladding materials.
C2TES1 — cementitious, improved, extended open time, non-slip, deformation Class S1 — is the specification that covers most wall cladding applications in a single product. Look for this classification on the product data sheet.
Epoxy Adhesive
Two-component epoxy adhesives cure through a chemical reaction rather than drying, delivering exceptional bond strength, chemical resistance, and waterproofing. They are the correct specification for wall cladding in permanently wet environments: swimming pool walls, water features, steam rooms, and industrial facilities exposed to chemicals. Epoxy adhesive is more expensive and requires greater skill in application, but for the right application it is the only appropriate choice. For a detailed guide to epoxy adhesives, see our article on Epoxy Tile Adhesive for Swimming Pools.
Ready-to-Use Polymer Adhesive (Dispersion / Contact Adhesive)
Ready-to-use polymer adhesives in tub or cartridge form are popular for lighter interior cladding applications — particularly lightweight PVC wall panels, 3D wall tiles, and thin decorative veneers. They are convenient but are not suitable for heavy stone, ceramic, or porcelain cladding on external walls. Always check the product’s maximum panel weight specification before use.
Polyurethane Construction Adhesive
Polyurethane adhesives provide very high bond strength, excellent flexibility, and strong performance on a range of substrates including wood, steel, and concrete. They are increasingly used for fixing lightweight architectural cladding panels, composite facade panels, and decorative external cladding systems. Not suitable for use as a tile adhesive in wet or submerged areas.
Adhesive Classification Quick Reference for Wall Cladding
| Code | Meaning | Bond Strength | Flexibility | Best Use |
| C1 | Standard cement adhesive | ≥0.5 N/mm² | None | Light indoor tiles only |
| C2 | Improved cement adhesive | ≥1.0 N/mm² | None | General wall cladding |
| C2T | C2 + non-slip | ≥1.0 N/mm² | None | Vertical walls |
| C2TS1 | C2T + Class S1 flexible | ≥1.0 N/mm² | ≥2.5mm | External cladding, WC |
| C2TS2 | C2T + Class S2 highly flexible | ≥1.0 N/mm² | ≥5.0mm | Pools, facades, coastal |
| R2 | Reactive (epoxy) adhesive | ≥2.0 N/mm² | High | Pools, chemical exposure |
Use this table as a specification reference. For most vertical wall cladding in India — exterior facades, bathroom walls, feature walls, and kitchen splash-backs — the C2TS1 classification covers your needs. Move to C2TS2 or R2 for swimming pools, permanently wet surfaces, and coastal installations.
Choosing Adhesive by Cladding Material Type
Different cladding materials have different characteristics — weight, porosity, thermal expansion, and surface chemistry — each of which influences the adhesive specification. Here is the material-by-material guide.
Natural Stone Cladding (Slate, Sandstone, Quartzite, Granite, Marble)
Natural stone is one of the most demanding cladding materials for adhesive specification. It is heavy, has variable thermal expansion rates, and some stone types (particularly marble and limestone) are prone to moisture-related staining from the adhesive. Key requirements:
- White adhesive for light-coloured or veined stone — grey adhesive can bleed through and permanently discolour the stone face
- C2TS1 minimum for external applications; C2TS2 for coastal and pool-adjacent locations
- Full-bed application essential — stone must have 100% adhesive coverage to prevent hollow spots that concentrate stress and cause cracking
- Anti-efflorescence formulation for porous sandstone and limestone to prevent white salt deposits on the face
For large-format natural stone cladding panels (over 600x600mm) or heavy pieces (over 20kg), mechanical fixings should always be used in addition to adhesive on vertical surfaces. Adhesive alone is not a safe specification for oversized or very heavy stone on external walls.
Porcelain and Ceramic Cladding Panels
Large-format porcelain cladding is increasingly popular on modern facades and interior feature walls. Porcelain is dense, non-porous, and dimensionally stable — but its low water absorption means standard adhesives do not bond reliably to its back surface.
- Always back-butter porcelain panels — apply a thin skim of adhesive to the panel back in addition to the notched bed on the wall
- Use a C2TS1 or C2TS2 adhesive for panels larger than 600x600mm
- For rectified large-format porcelain on external walls, consider a C2TS2 or R2 grade
- For thin porcelain slabs (gauged porcelain tiles 3–6mm thick), a specialist flexible adhesive with extended open time is essential
Brick Slips and Brick-Effect Cladding
Brick slips are thin sections of fired clay or reconstituted stone designed to replicate the appearance of exposed brickwork. They are typically 20–25mm thick, moderately heavy, and have a rough back texture that aids mechanical keying.
- C2T or C2TS1 adhesive for interior brick slip installations
- C2TS1 or C2TS2 for external brick slip facades — thermal movement is significant given the dark colours common in brick slip products
- Ensure joints are raked and pointed with appropriate mortar or flexible grout after adhesive has set
- For reclaimed or handmade brick slips with irregular backs, use a thick-bed adhesive (up to 15mm) to accommodate variation
Slate and Split-Face Mosaic Cladding
Split-face slate and stone mosaics create a dramatic textured effect but present specific adhesive challenges. The irregular surface means contact area is variable, and the texture traps air if adhesive coverage is insufficient.
- Use a C2TS1 adhesive with extended open time to allow careful positioning of irregular pieces
- Apply adhesive generously to fill behind the irregular back surface
- White adhesive recommended for light-coloured slate and quartz crystal mosaic
- For outdoor split-face installations, C2TS2 is the appropriate specification given the increased surface area exposed to rain ingress
Glass and Mirror Cladding
Glass and mirror panels require white adhesive to preserve the reflective and visual qualities of the material. Bond strength is entirely dependent on contact adhesion since glass is non-porous.
- White C2TS1 adhesive or a specialist mirror adhesive formulated for glass substrates
- Full-bed application — no ridged trowel finish that would leave air gaps behind the glass
- Never use solvent-based adhesives on mirrors — they attack the silver backing and cause irreversible black spotting
For detailed guidance on glass adhesive applications, see our guide: Glass Mosaic Tile Adhesive — The Complete Guide.
Lightweight Decorative Panels (PVC, Foam, WPC)
Lightweight decorative cladding panels made from PVC, expanded polystyrene composites, or wood-plastic composite (WPC) are popular for interior feature walls due to their ease of installation and low cost. They require a different adhesive approach to heavy stone or ceramic:
- Ready-to-use polymer adhesive or polyurethane construction adhesive is appropriate
- Avoid cementitious adhesives — these are over-engineered for lightweight panels and their alkalinity can attack some foam-backed products
- Always check the manufacturer’s adhesive recommendation for the specific panel product
Indoor vs Outdoor Vertical Wall Cladding Adhesive
The distinction between interior and exterior cladding adhesive is one of the most important decisions in specification — and one of the areas where under-specification is most common. Here is a clear framework.
| Factor | Interior Cladding Adhesive | Exterior Cladding Adhesive |
| Moisture exposure | Low to moderate | High — rain, humidity, dew |
| Temperature range | Stable — 18°C to 28°C | Wide — 5°C to 60°C (India) |
| UV exposure | None | Significant — affects binders |
| Freeze-thaw cycles | Not applicable | Risk in high-altitude regions |
| Minimum grade required | C2T | C2TS1 (coastal/pools: C2TS2) |
| Colour requirement | White for pale materials | Grey acceptable for dark materials |
| Waterproofing membrane | Required for wet areas only | Recommended for all exposures |
| Movement joints | Perimeter only | Every 3–4m + perimeter |
In India’s monsoon climate, exterior wall cladding adhesive must be specified for sustained water exposure — not just occasional rain. Western coastal regions like Mumbai, Goa, Mangalore, and parts of Kerala receive 2,000–3,500mm of rainfall annually concentrated over four months. During this period, external cladding adhesive is under essentially continuous wet-load. C2TS2 grade is the responsible minimum specification for external cladding in high-rainfall zones.
Substrate Guide: Which Adhesive for Which Wall
The substrate — the wall the cladding is fixed to — plays a critical role in adhesive selection and surface preparation. Here is the substrate-by-substrate guidance.
Cement-Rendered or Plastered Walls
The most common substrate for wall cladding in Indian construction. A cement-rendered wall provides a good mechanical key and adequate suction for cementitious adhesives. Ensure the render is fully cured (minimum 28 days for OPC-based render), sound, and free from laitance, dust, and loose material. Prime with a diluted polymer primer before applying adhesive if the render has very high or very low suction. For guidance on the render beneath the cladding, see: Water-Resistant Ready Mix Plaster.
Concrete Walls
Concrete is dense and low-suction, which means cementitious adhesives bond differently to concrete than to rendered masonry. Use a bonding primer or a C2 adhesive with enhanced concrete adhesion. Ensure any form-release oil has been removed by mechanical abrasion or chemical degreasing before applying the primer. Smooth concrete should be mechanically keyed (scarified or shot-blasted) for best results.
Brick and Block Masonry
Brick and blockwork provide good mechanical key but variable suction depending on the brick type. Pre-dampen high-suction brick slightly before applying adhesive — this prevents rapid moisture loss from the adhesive that would compromise curing. For AAC (lightweight concrete blocks), use a compatible primer first, as AAC has very high suction that can draw moisture from the adhesive bed too quickly. For comparison of plaster options over AAC blocks, see: Gypsum vs Cement-Based Ready Mix Plaster.
Existing Tiled or Clad Surfaces (Tile-on-Tile)
Fixing cladding over an existing tiled surface is possible but requires careful assessment. The existing tiles must be fully bonded — tap each tile and replace any hollow-sounding ones. The surface must be clean, free from grease and cleaning products, and lightly abraded or primed to improve adhesion. Use a C2TS1 adhesive with a polymer primer for tile-on-tile applications. This approach is not recommended for heavy stone cladding where the combined weight creates a structural risk.
Plasterboard (Gypsum Board / Drywall)
Plasterboard substrates are common in partition walls, particularly in commercial interiors. The key limitation is weight — plasterboard has limited pull-out strength and standard plasterboard fixings restrict the panel weight that can be safely supported. Use a polymer-based adhesive with a high initial grab and ensure panels are within the substrate’s safe load capacity. Wet area applications on plasterboard require moisture-resistant board (green board or tile-backer) as a substrate, never standard plasterboard.
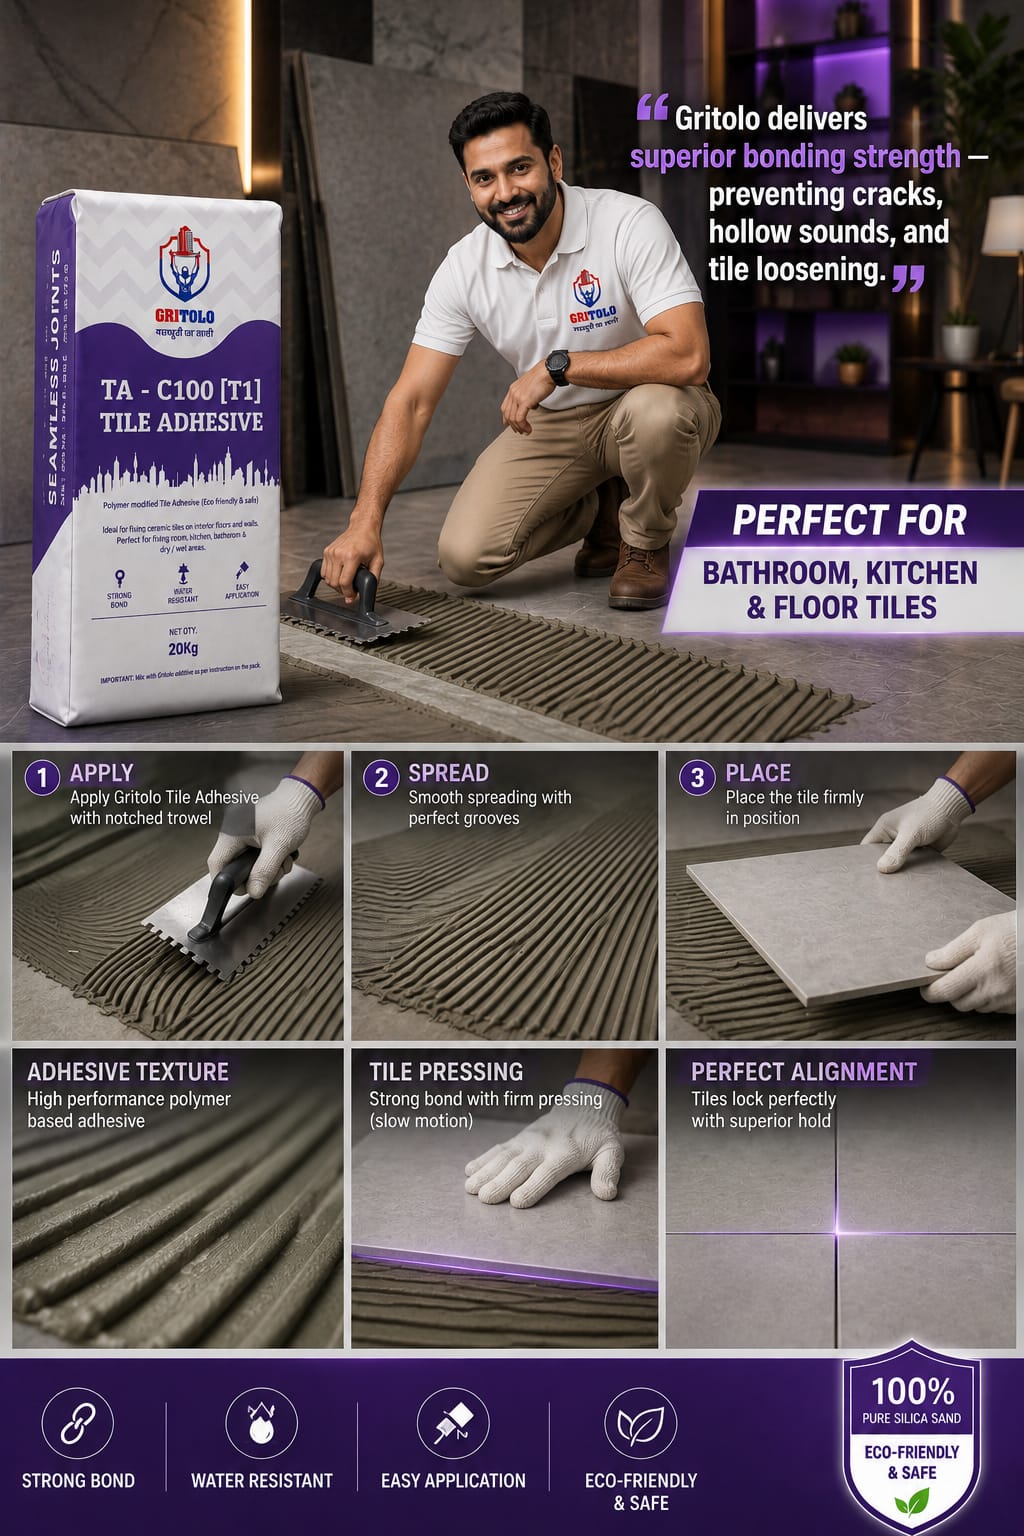
Step-by-Step: How to Apply Vertical Wall Cladding Adhesive
Correct application technique is as important as correct adhesive selection. Follow this process for professional, long-lasting results.
Step 1 — Assess and Prepare the Substrate
Begin with a thorough substrate inspection. Check for flatness using a 2-metre straight edge — variation greater than 3mm must be corrected before cladding begins. Test suction by applying a few drops of water to the wall surface: immediate absorption indicates high suction (prime first); water remaining on the surface for several seconds indicates low suction (use a bonding primer). Remove all dust, oil, paint, and loose material. Any cracks wider than 1mm should be repaired and allowed to cure fully before proceeding.
Step 2 — Apply Waterproofing Membrane (Where Required)
For bathroom walls, wet room walls, kitchen areas behind hobs, and all external surfaces in high-exposure locations, apply a suitable waterproofing membrane to the prepared substrate before beginning tiling. Allow the membrane to cure fully as specified by the manufacturer — typically 4–24 hours. Do not apply adhesive over wet membrane.
Step 3 — Plan Your Layout
Before applying any adhesive, dry-lay your cladding from the floor upward and from the centre outward to plan the layout. Mark a true horizontal datum line using a spirit level. This is your reference line for the first course of cladding. Identify cut pieces at edges and plan for visual symmetry. Mark the wall into working sections of no larger than 0.75–1m² to control the adhesive open time.
Step 4 — Mix the Adhesive
Add the adhesive powder to clean, cold water in the specified ratio. Always add powder to water — not water to powder. Mix with a slow-speed mechanical mixer (300–400 RPM) until smooth and lump-free. Allow to slake for 3–5 minutes, then remix briefly. Do not add additional water after slaking. Mix only as much adhesive as you can use within the stated open time — typically 30–45 minutes depending on temperature.
Step 5 — Apply to the Wall
Using a notched trowel of the correct notch size for your cladding material, apply the adhesive to the wall in a thin, even ridged bed. Hold the trowel at 45–60 degrees to form consistent ridges. Work within one section at a time. For large-format panels and stone, also back-butter the panel or tile (apply a thin skim of adhesive to the back face) to ensure full contact between the adhesive and the non-porous back surface.
| Cladding Type | Recommended Trowel Notch | Back-Butter Required? |
| Glass mosaic / small mosaic tiles | 3mm V-notch or 4mm square | Yes — for non-porous glass |
| Standard ceramic / glazed tiles | 6mm square notch | Recommended for smooth backs |
| Porcelain panels up to 600x600mm | 8mm square notch | Yes — always for porcelain |
| Large-format porcelain >600mm | 10–12mm square notch | Yes — mandatory |
| Natural stone (thin slips) | 6–8mm square notch | Yes — recommended |
| Brick slips | 8–10mm square notch | Recommended |
| Split-face / irregular stone | 12mm square notch | Yes — to fill behind irregularities |
Step 6 — Fix the Cladding Panel
Press the cladding panel firmly onto the adhesive bed with a slight twisting motion to collapse the ridges and ensure full contact. Use a rubber mallet to tap the panel into final position. Check alignment immediately with a spirit level. Fit spacers at joints to maintain consistent gap widths. Work upward from your datum line, checking level and plumb regularly.
Step 7 — Check Adhesive Coverage
At intervals during installation, remove a recently fixed panel (within the first few minutes of placement) and inspect the adhesive transfer on the back of the panel and on the wall. You should see complete, even adhesive coverage. Aim for a minimum of 80% coverage for interior dry applications and a minimum of 95% for external and wet-area installations. Adjust your trowel size or back-buttering technique if coverage is low.
Step 8 — Install Movement Joints
At all perimeter edges, changes in plane, and at intervals of no more than 3–4 metres on external facades and large internal installations, leave a clear joint and fill with a flexible, colour-matched silicone or polyurethane sealant rather than grout. These movement joints accommodate structural movement and thermal expansion without transmitting stress into the cladding or adhesive.
Step 9 — Allow to Set Before Grouting
Allow the adhesive to set for a minimum of 24 hours (48 hours in cool or humid conditions) before applying grout or pointing mortar. Do not apply any load to the installation or allow contact with water during this period. In hot direct sunlight, cover the installation with sheeting to prevent rapid drying that compromises the adhesive cure.
Step 10 — Point and Seal Joints
Apply appropriate pointing mortar or grout to the joints. For natural stone, use an unsanded fine-particle grout to avoid scratching. For brick slips, use a matching brick mortar pointing compound. Clean excess material from the face immediately with a damp sponge. Apply a stone or grout sealer as appropriate for the material to complete and protect the installation.
Long-Tail Questions Answered: What People Actually Search
These are the real questions people type into search engines when planning a wall cladding project. Here are clear, practical answers.
What is the best adhesive for stone cladding on external walls in India?
The best adhesive for external stone wall cladding in India is a C2TS1-grade white, polymer-modified flexible cementitious adhesive — for most applications. In coastal areas, high-rainfall zones (Kerala, Goa, Maharashtra coast), and pool-adjacent surfaces, upgrade to C2TS2. In all cases, back-butter the stone and ensure 95%+ adhesive coverage. For large or heavy stone pieces, combine adhesive with mechanical fixings.
How do I fix wall cladding without drilling?
For lightweight interior cladding panels (PVC, WPC, foam-backed decorative panels), a high-grab ready-to-use polymer adhesive or cartridge polyurethane adhesive can fix panels without drilling. The wall surface must be clean, flat, and primed as required. However, for ceramic, stone, or porcelain cladding on any surface — and all exterior cladding — a full cementitious adhesive bed is the professional specification. For heavy exterior stone, mechanical fixings are mandatory regardless of adhesive type.
Can I use tile adhesive for wall cladding?
Yes — if the tile adhesive is correctly specified for the application. Standard floor tile adhesive (C1 grade) is not suitable for vertical wall cladding because it lacks non-slip performance and adequate bond strength for vertical applications. Always use a C2T or C2TS1-grade adhesive that is explicitly rated for vertical surfaces. Gritolo’s cladding adhesive range is formulated precisely for wall applications.
What adhesive is best for cladding in a bathroom?
For bathroom wall cladding, use a white C2TS1 polymer-modified waterproof-grade adhesive. In shower enclosures and areas of direct water contact, apply a waterproofing membrane to the substrate first. Ensure all joints are sealed with flexible waterproof grout or silicone sealant. Never use standard or non-waterproof-grade adhesive in a bathroom — moisture will penetrate the grout joints and attack the adhesive bed over time.
Why is my wall cladding falling off?
The most common causes are: incorrect adhesive type (standard floor adhesive used on walls); insufficient adhesive coverage (hollow spots that concentrate stress); inadequate substrate preparation (dusty, painted, or oily surface preventing bonding); missing back-butter on non-porous porcelain or glass; failure to cure the substrate plaster before tiling; and grouting before the adhesive had fully set. In external installations, the absence of movement joints causes stress build-up that eventually leads to debonding.
How long does wall cladding adhesive take to set?
Standard polymer-modified cementitious cladding adhesive reaches sufficient set for grouting after 24 hours at 20–25°C. In cooler conditions (below 15°C) or high humidity, allow 48 hours. Full cure strength is typically reached at 28 days. Avoid water exposure and mechanical load until the adhesive has fully set. Epoxy adhesive typically sets harder and faster — check the specific product data sheet.
Do I need to waterproof the wall before applying cladding adhesive?
For exterior walls and bathroom wet zones, yes — a waterproofing membrane should be applied to the prepared substrate before the cladding adhesive. The adhesive itself provides water resistance but is not a standalone waterproofing system. Water will eventually penetrate grout joints under sustained exposure, and if the substrate behind the adhesive is not protected, moisture ingress can cause substrate deterioration and adhesive debonding.
What is the correct notch trowel size for wall cladding adhesive?
Notch size is determined by the cladding material size and the back texture. As a guide: small mosaic and thin veneers — 3–4mm notch; standard tiles and ceramic cladding — 6mm notch; porcelain panels up to 600mm — 8mm notch; large-format porcelain and stone — 10–12mm notch. Always check adhesive coverage by removing a tile after pressing — you should see even adhesive transfer across the entire back surface.
Common Mistakes in Wall Cladding Adhesive Applications
- Using floor tile adhesive on vertical walls: Standard C1 adhesive has no non-slip performance. Panels slide before the adhesive sets. Always specify C2T as the minimum for vertical applications.
- Skipping the back-butter step: On non-porous porcelain, glass, and polished stone, notched adhesive alone leaves air gaps behind the panel. Back-buttering is mandatory for full coverage and reliable bond strength.
- Working too large a section: Applying adhesive to more wall than you can clad within the product’s open time causes the adhesive to skin over and lose bond. Work in sections of 0.75–1m².
- Not correcting substrate flatness: Cladding panels amplify wall irregularities. Variation greater than 3mm over 2 metres causes lippage (stepped joints) that is visible and unacceptable on finished work.
- Omitting movement joints: On external facades and large interior installations, omitting perimeter and intermediate movement joints creates a rigid system that cannot accommodate thermal expansion. The result is crack propagation through tiles and eventual debonding.
- Applying adhesive over uncured render: Render must cure for a minimum of 28 days before cladding is applied. Applying adhesive over green render leads to shrinkage cracking that propagates through the adhesive bed and cladding.
- Using grey adhesive behind light or translucent cladding: Grey adhesive showing through light-coloured or translucent stone or glass permanently ruins the appearance. Always use white adhesive for pale cladding materials.
- Rushing the grout: Pointing before the adhesive has fully set can displace panels, particularly on vertical surfaces where they have limited mechanical restraint.
Gritolo’s Cladding Adhesive Range: The Right Product for Every Vertical Wall
Gritolo Global India Private Limited manufactures a complete range of tile and cladding adhesives formulated for the full spectrum of Indian construction environments — from air-conditioned interiors to coastal facades battered by the South-West monsoon. Here is how our range maps to vertical wall cladding applications:
| Gritolo Product | Classification | Ideal Application | Colour Available |
| TA–V200 | C2T | Interior cladding, feature walls, bathrooms | White & Grey |
| TA–M300 | C2TS1 | External facades, wet rooms, heavy stone | White & Grey |
| TA–G400 | C2TS2 | Coastal, pools, high-rainfall facades | White & Grey |
| TA–E500 (Epoxy) | R2 | Submerged walls, chemical exposure, steam rooms | White |
All products in our cladding adhesive range are manufactured at our Pune facility and tested to EN 12004 and BIS standards before dispatch. Our technical data sheets are available for every product and provide detailed specification guidance for every application scenario.
Explore the full Gritolo product range: Visit gritolo.com/shop or call our technical team on +91 7397985754 for project-specific adhesive recommendations.
Why You Can Trust This Advice
Construction advice online ranges from excellent to dangerously wrong. At Gritolo, we apply the same rigour to our editorial content as we do to our product formulations. The guidance in this article is written and reviewed by civil engineers and construction materials specialists who work directly with Gritolo products on real projects across India every day.
Every performance claim, every specification recommendation, and every application guideline in this guide is grounded in product testing data, field experience, and published EN and BIS standards. We do not publish content for traffic — we publish it because builders deserve accurate information.
If your project has a specific substrate, climate zone, or cladding material that is not covered in this guide, call our technical team directly. We are genuinely available to help you get the specification right before work starts — not after something has failed.
Frequently Asked Questions (FAQ)
The following answers are formatted for Google’s FAQ schema. Add them in the FAQ block in Rank Math or Yoast SEO for rich result eligibility in Google Search.
Q1. What is the best adhesive for vertical wall cladding?
The best adhesive for vertical wall cladding is a polymer-modified flexible cementitious adhesive classified as C2T or C2TS1. It delivers high bond strength, non-slip performance on vertical surfaces, and adequate flexibility for thermal movement. For external facades and wet areas, specify C2TS1 minimum. For pools and coastal installations, use C2TS2 or epoxy R2.
Q2. Can I use normal tile adhesive for wall cladding?
Not reliably. Standard C1-grade tile adhesive lacks non-slip performance on vertical surfaces, which causes panels to slide before setting. For wall cladding, always use a C2T-grade or higher adhesive specifically rated for vertical applications.
Q3. Do I need to back-butter cladding panels?
Yes — for porcelain, glass, and polished stone cladding, back-buttering (applying a thin skim of adhesive to the panel back) is mandatory. These materials are non-porous and require full adhesive contact for reliable bond strength. Even for textured cladding materials, back-buttering improves coverage and is always recommended for external applications.
Q4. What adhesive do I use for stone cladding on external walls?
Use a white C2TS1 polymer-modified flexible adhesive for most external stone cladding applications. In coastal zones or high-rainfall regions of India, specify C2TS2. Ensure 95% or greater adhesive coverage. For large or heavy stone pieces on external walls, combine adhesive with mechanical fixings for structural safety.
Q5. How long should I wait before grouting wall cladding?
Wait a minimum of 24 hours after fixing cladding before applying grout — 48 hours in cool or humid conditions. Grouting before the adhesive has sufficiently set can displace panels on vertical surfaces and compromise the bond. Check that the adhesive feels firm and there is no flex in the panel when pressed before proceeding.
Q6. What size notched trowel should I use for wall cladding adhesive?
Trowel notch size depends on the cladding material: 3–4mm for glass mosaic; 6mm for standard ceramics; 8mm for porcelain up to 600mm; 10–12mm for large-format porcelain and stone. Always verify adhesive coverage by removing a panel within the first few minutes of fixing to confirm even transfer across the entire back surface.
Q7. Is waterproofing required before applying wall cladding adhesive?
Yes — for bathroom wet zones, shower enclosures, external walls, and any surface with sustained moisture exposure. Apply a waterproofing membrane to the prepared substrate before the adhesive bed. The adhesive and grout are water-resistant but do not form a standalone waterproofing system. In dry interior areas, waterproofing is not required.
Q8. Where can I buy Gritolo wall cladding adhesive?
Gritolo’s tile and cladding adhesive range is available through our authorised distributor network across India and directly through our website at gritolo.com/shop. For bulk supply, project specification support, or technical queries, contact our team at +91 7397985754 or via the Contact Us page at gritolo.com/contact.
Related Guides on the Gritolo Blog
If this guide helped you, these related articles on the Gritolo blog will also be useful for your project:
- Glass Mosaic Tile Adhesive: The Complete Guide 2026
- Epoxy Tile Adhesive for Swimming Pools: Ultimate Guide 2026
- Water-Resistant Ready Mix Plaster: Complete Guide for Builders & Homeowners
- Gypsum vs Cement-Based Ready Mix Plaster: Which Is Right for Your Project?
- Browse Gritolo’s full tile adhesive and cladding product range
The Right Adhesive Makes the Difference
Vertical wall cladding is one of the most impactful design choices in any construction or renovation project. But the visual result lasts only as long as the adhesive holding it in place.
Choose an adhesive with the right classification for your cladding material, your substrate, and your environment. Use the correct trowel, ensure full coverage, incorporate movement joints, and give the adhesive the time it needs to cure properly. These are not complex requirements — but they are the difference between cladding that looks exceptional for decades and cladding that fails within a monsoon season.
At Gritolo Global India Private Limited, we manufacture cladding and tile adhesives that are designed for real Indian construction conditions — the heat of Rajasthan, the humidity of coastal Kerala, the driving rain of Mumbai’s South-West monsoon. Every product is backed by technical data, quality assurance, and a team that is available to help you specify correctly.
Ready to specify or order? Visit gritolo.com/shop or call our technical team on +91 7397985754 — we will help you choose the right adhesive for your project, every time.
About the Author
Gritolo Editorial Team
Construction Materials Specialists | Gritolo Global India Private Limited
The Gritolo Editorial Team brings together civil engineers, construction materials technologists, and experienced tile and cladding installation professionals working directly from our Pune headquarters. Our team is involved in the formulation, testing, and on-site application support of Gritolo’s full product range — including tile adhesives, cladding adhesives, ready mix plasters, epoxy systems, and floor hardeners. Every article we publish is grounded in technical accuracy, field experience across hundreds of Indian construction projects, and reference to EN and BIS standards.
We write for people who are actually building things — contractors, architects, site managers, and homeowners who need information they can trust and act on. Our products are made in India, tested in India, and used on Indian construction sites in every climate zone from the high-altitude cold of Himachal Pradesh to the tropical humidity of the Kerala coast. Our content reflects that breadth of real-world experience.
📍 Pune, Maharashtra, India | 🌐 gritolo.com | 📞 +91 7397985754