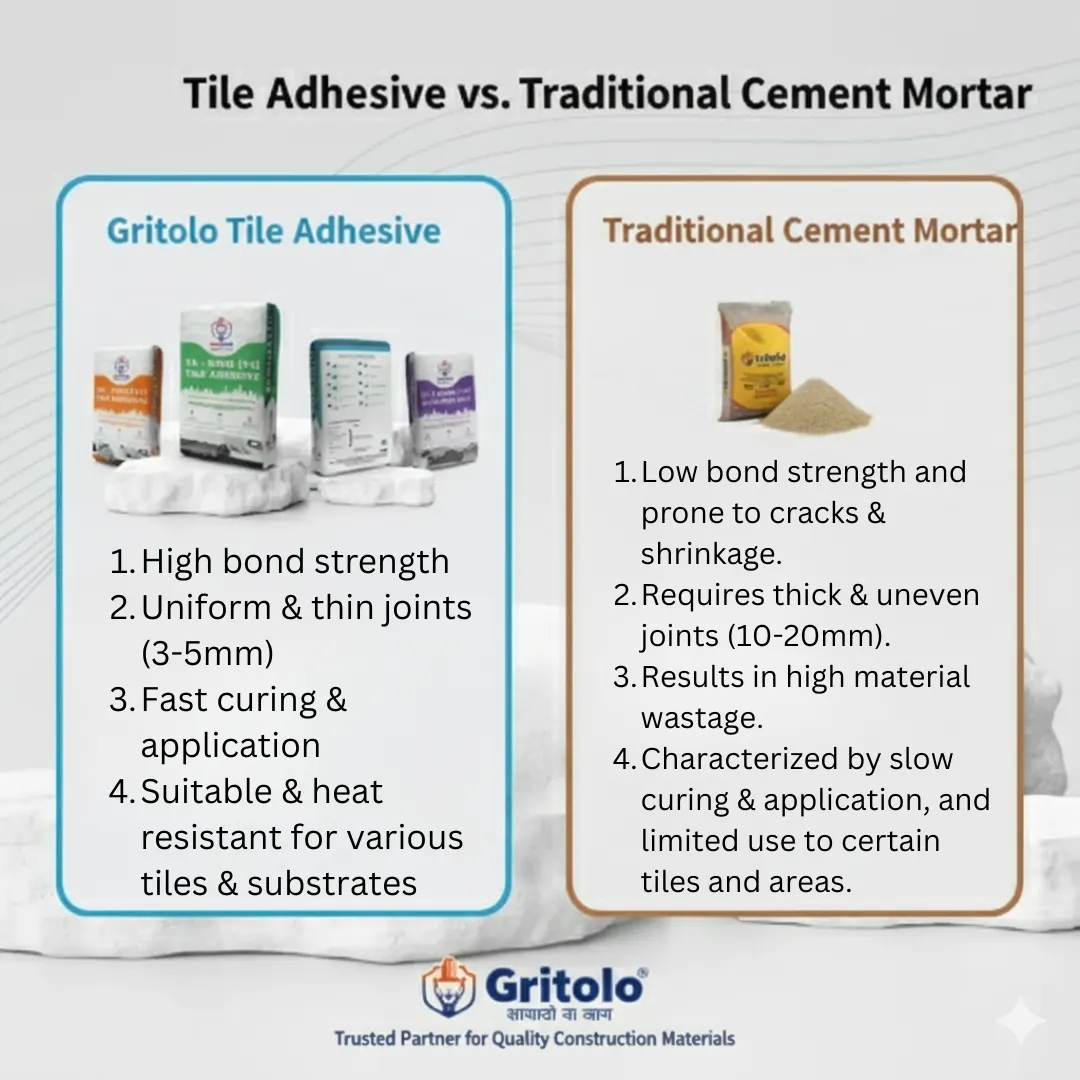
Tile Adhesive vs Traditional Cement Mortar Benefits: Why the Old Ways are Failing Modern Homes
Walk into any construction site in India twenty years ago, and you would see the same scene: huge piles of river sand, bags of cement, and laborers mixing a thick, muddy paste to lay heavy mosaic or red clay tiles.
Fast forward to 2026. The tiles have changed. We now use sleek, large-format Vitrified tiles, Italian Marble, and glass-like Granite. These materials are engineering marvels—dense, non-porous, and perfectly flat.
Yet, many homeowners and contractors make a fatal error: They try to install these modern tiles using the old method.
The result? Hollow sounds within six months. Cracked tiles within a year. Complete debonding (popping) within two years.
If you are planning a renovation or a new project, you are likely facing the great debate: Tile Adhesive vs Traditional Cement Mortar.
At Gritolo Global India Pvt Ltd, we believe in building for the future, not the past. In this comprehensive industry guide, we will dismantle the myths, explain the science of adhesion, and detail the massive benefits of switching to engineered tile adhesives.
1. Defining the Contenders: What is the Difference?
To understand the Tile adhesive vs traditional cement mortar benefits, we must first define what we are actually putting on our floors.
The Old Guard: Traditional Cement Mortar
This is a site-mixed concoction.
- Recipe: Cement + River Sand + Water.
- Ratio: Usually 1:4 or 1:6, depending on the mason’s mood.
- Method: Applied in thick blobs (20mm to 30mm) on the back of the tile.
- Mechanism: Mechanical Interlocking (Friction).
The Modern Solution: Polymer Modified Tile Adhesive
This is a factory-engineered chemical compound.
- Recipe: High-grade Cement + Graded Sand + Polymers (Resins/Latex) + Additives.
- Ratio: Just add water. The chemistry is pre-balanced.
- Method: Applied in a thin layer (3mm to 6mm) using a notched trowel.
- Mechanism: Chemical Bonding + Mechanical Interlocking.
Now, let’s explore why the latter is superior in almost every category.
2. The Science of Bonding: Why Cement Fails on Vitrified Tiles
This is the most critical point in the entire debate.
How Cement Works (The Sponge Effect):
Traditional cement mortar works by flowing into the pores of a material. Think of a red brick or a clay pot—it absorbs water. The liquid cement enters these tiny holes, hardens, and creates “hooks.” This is called Mechanical Interlocking.
The Problem with Modern Tiles:
Modern Vitrified tiles are manufactured to be non-porous (water absorption < 0.05%). They are as smooth as glass. They have no pores.
When you put cement on a vitrified tile, there is nowhere for the cement to grab onto. It is like trying to stick tape to a wet, oily surface. It might stick initially due to suction, but once it dries, the bond breaks.
How Gritolo Tile Adhesive Works:
Tile adhesives contain Polymers. These polymers create a Chemical Bond. They adhere to the surface of the tile on a molecular level. This allows Gritolo adhesives to stick to glass, steel, and high-gloss vitrified tiles with incredible strength.
Benefit: Zero debonding risk for modern tiles.
3. Flexibility vs. Rigidity (The Thermal Shock Factor)
Buildings are not static. They move.
- They expand when the sun hits them (Thermal Expansion).
- They shrink at night.
- They vibrate when heavy trucks pass by.
The Cement Flaw:
Cement mortar is rigid and brittle. When the concrete slab below expands, or the tile above expands due to heat, the rigid cement layer cannot move. It snaps. This energy transfer causes the tile to crack or pop up (the dreaded “tenting” effect).
The Adhesive Advantage:
One of the major Tile adhesive vs traditional cement mortar benefits is Flexibility. The polymers in Gritolo adhesives act like tiny rubber bands. They allow the adhesive bed to stretch and compress slightly (Deformability).
- When the building moves, the adhesive absorbs the shock.
- The tile remains safe and intact.
4. The “Hollow Sound” Nightmare
We have all heard it. You tap a tile with a coin, and it sounds empty underneath.
Why Cement Causes Hollows:
- Shrinkage: Cement shrinks significantly as it dries. If applied thick (20mm), it shrinks away from the tile, leaving an air gap.
- Spot Bonding: Masons often put 4 “blobs” of cement on the corners of the tile (called the Laddu method) to level it. This leaves 60% of the tile unsupported. If you drop a heavy object on the hollow part, the tile breaks.
Why Adhesive Solves This:
Tile adhesive is applied using a Notched Trowel. This tool spreads the adhesive in uniform ridges across the entire surface. When the tile is pressed down, the ridges collapse, creating 100% Contact Coverage.
- No air gaps.
- No hollow sounds.
- High load-bearing capacity.
5. Speed and Convenience (Time is Money)
In construction, every day saved is money earned.
Traditional Mortar Delays:
- Sieving: Laborers spend hours sieving sand to remove stones.
- Soaking: Old ceramic tiles had to be soaked in water for hours before installation.
- Curing: This is the big one. Cement mortar requires water curing for 7 to 10 days. You cannot grout or walk on it properly during this time.
Tile Adhesive Speed:
- Ready to Use: Open bag, add water, mix. Start working in 5 minutes.
- No Soaking: Modern tiles do not need soaking. Adhesive does not need it either.
- No Curing: Gritolo Tile Adhesives are Self-Curing. You can grout the floor after 24 hours. You can hand over the site days earlier.
6. Thin Bed Technology: Saving Height and Weight
In high-rise apartments or renovations, weight matters.
Traditional Bulk:
To level a floor with cement mortar, masons apply a layer 20mm to 30mm thick.
- This adds immense “Dead Load” (weight) to the building structure.
- It reduces the ceiling height of your room by over an inch.
Adhesive Slimness:
Tile adhesive uses Thin Bed Technology. The layer is only 3mm to 6mm thick.
- Weight: Significantly reduced load on the slab.
- Height: You save floor height (crucial for door clearances during renovation).
7. Aesthetic Perfection and Adjustability
Have you ever seen a tiled floor where the lines are crooked?
Cement Issues:
Cement dries relatively fast and has poor “workability.” Once the mason places the tile, it is hard to adjust. If they try to move it, the bond breaks. This leads to uneven lines.
Adhesive Precision:
Gritolo Tile Adhesives have extended Open Time and Correction Time.
- The adhesive stays wet and sticky for 20-30 minutes.
- The mason can slide the tile gently to ensure perfect alignment with spacers.
- The adhesive does not sag, ensuring the tiles stay level (lippage-free).
8. Versatility: Doing What Cement Can’t
There are certain applications where comparing Tile adhesive vs traditional cement mortar benefits isn’t even fair, because cement simply cannot do the job.
A. Tile-on-Tile Application
Renovating an old floor?
- Old Way: Break the old tiles. immense noise, dust, debris disposal costs, and risk of damaging the slab.
- New Way: Use a Type 3 or Type 4 Gritolo Adhesive to stick new tiles directly over the old ones. The chemical bond grips the old glossy surface perfectly. Cement cannot do this.
B. Vertical Wall Tiling
Tiling a bathroom wall or an elevator facade?
- Old Way: Cement slips. Masons have to use supports and work very slowly.
- New Way: Gritolo Adhesives have Slip Resistance. You press the tile on the wall, and it stays there against gravity.
C. Glass Mosaics & Swimming Pools
Glass has zero porosity. Cement will fail 100% of the time. Only polymer-modified adhesive works for pools and glass mosaics.
9. The Cost Analysis: The “Per Bag” Myth
This is the biggest objection we face. “Sir, a bag of cement is ₹350. Your adhesive is ₹500+. It is too expensive.”
Let’s look at the Total Applied Cost, not just the material cost.
Hidden Costs of Cement Mortar:
- Sand Cost: River sand is expensive and scarce.
- Worker Cost (Prep): Paying people to sieve sand and soak tiles.
- Labor Cost (Curing): Paying people to water the floor for 7 days.
- Material Volume: You need 4x more material volume (20mm vs 5mm).
- Wastage: High rebound loss and sand spillage.
- Risk Cost: The cost of re-tiling when it cracks in 2 years is huge.
Savings with Gritolo Adhesive:
- Zero Sand: No sand needed.
- Faster Labor: Masons cover more area per day.
- Zero Curing: Project finishes faster.
- Longevity: One-time application for life.
Verdict: When you calculate the total cost per square foot including labor and longevity, Tile Adhesive is often cheaper or equal to cement mortar, with vastly superior quality.
10. Gritolo’s Range: A Solution for Every Tile
Not all adhesives are the same. At Gritolo, we categorize our products based on the IS 15477 standard to help you choose the right strength.
- T1 (Gritolo TA-C100): For ceramic/clay tiles and porous stones. The budget-friendly upgrade from cement.
- T2 (Gritolo TA-V200): For Vitrified tiles (up to 2×2 or 4×2) on floors and walls. The standard for modern homes.
- T3 (Gritolo TA-M300): High polymer. For Tile-on-Tile, Swimming Pools, Glass Mosaics, and Exterior Facades.
- T4 (Gritolo TA-G400): Ultra-premium. For Drywall substrates (Gypsum/Plywood) and large format slabs.
Comparison Summary Table
For the busy reader, here is the cheat sheet on Tile adhesive vs traditional cement mortar benefits.
| Feature | Traditional Cement Mortar | Gritolo Tile Adhesive |
|---|---|---|
| Bond Type | Mechanical (Friction) | Chemical + Mechanical |
| Suitability | Porous Tiles (Ceramic/Clay) | All Tiles (Vitrified, Glass, Stone) |
| Thickness | 20mm – 30mm (Thick Bed) | 3mm – 6mm (Thin Bed) |
| Soaking Tiles | Required | Not Required |
| Curing (Watering) | Required (7 Days) | Not Required (Self-Curing) |
| Debonding Risk | High (Hollow sounds) | Zero (Full contact) |
| Flexibility | Rigid (Prone to cracking) | Flexible (Shock absorbing) |
| Site Cleanliness | Messy (Sand piles) | Clean (Bags only) |
| Tile-on-Tile | Impossible | Possible |
Step-by-Step: How to Use Tile Adhesive
Making the switch is easy. Here is the process:
- Surface Prep: Ensure the floor/wall is clean, dry, and flat. Remove oil, grease, and loose dust.
- Mixing: Take clean water in a bucket. Add Gritolo Adhesive powder. Mix with a mechanical stirrer until creamy. Let it sit for 5 minutes (to activate polymers). Mix again.
- Spreading: Use a Notched Trowel. Spread adhesive on the floor to create ridges.
- Back Buttering: For large tiles, apply a thin coat on the back of the tile too.
- Placing: Press the tile firmly into the ridges. Twist slightly to ensure full coverage. Tap with a rubber mallet.
- Grouting: Wait 24 hours, then fill joints with grout.
Build It Once, Build It Right
The debate of Tile adhesive vs traditional cement mortar benefits is settled. Science has won.
If you are building a budget home with clay tiles, cement mortar is acceptable.
But if you are building a modern home with Vitrified tiles, Granite, or Italian Marble, using cement is a risk you cannot afford to take.
Your floor is the most used surface in your house. It bears your weight every day. Don’t let it sound hollow. Don’t let it crack.
Choose Gritolo Tile Adhesives. Choose the bond that lasts a lifetime.
Ready to start your project?
👉 Call Gritolo Experts: +91 7397985754
👉 View Our Product Range
👉 Find a Dealer Near You
Gritolo: Innovation. Resilience. Perfection in every bond.